OAuth2 And OIDC Concepts
Introduction To Authentication and Authorization
Before we can understand OAuth2 and OIDC, Let us explain the frequently used terms like Authentication and Authorization using plain English and real-life examples that are relatable—even if someone has no technical background in cybersecurity.
What’s the Difference Between Authentication and Authorization?
| Term | What It Means | Simple Analogy |
|---|---|---|
| Authentication | Proving who you are | Showing your ID to enter a building |
| Authorization | Proving what you’re allowed to do | Having a key to enter specific rooms |
Real-Life Example 1: Airport Security
Authentication: At the airport check-in, you show your passport and boarding pass to prove that you are John Smith and that you have a flight.
Authorization: Once inside, your boarding pass might allow you to:
- Enter the domestic terminal but not international gates
- Sit in economy class but not business class
Conclusion: Authentication let you in the airport, but authorization decided where you can go.
Real-Life Example 2: Hospital Visit
- Authentication: You walk up to the front desk and show your driver’s license to check in as a patient.
- Authorization: Based on your condition, you’re authorized to access the X-ray department but not the surgery wing or staff-only areas.
Conclusion: The hospital now knows who you are (authentication), but only allows you to access certain areas (authorization).
Real-Life Example 3: Logging into a Streaming Service (like Netflix)
Authentication: You enter your email and password to log in. The system verifies it’s really you.
Authorization:
- You have the Standard Plan, so you’re authorized to stream in HD but not Ultra HD.
- You can create up to 2 profiles but not 5 (like on the Premium Plan).
Conclusion: You’re authenticated when you log in, and you’re authorized for specific features based on your subscription.
Summary in One Line:
Authentication answers: “Who are you?” Authorization answers: “What can you do?”
Here’s a business executive–friendly explanation of Authentication vs. Authorization, using examples that relate to leadership, enterprise systems, and workplace scenarios.
Understanding Authentication vs. Authorization for Business Executives
In enterprise environments—especially those with digital transformation, cloud platforms, or identity management—two key concepts define access control:
| Term | Executive-Friendly Definition |
|---|---|
| Authentication | Verifying who someone is |
| Authorization | Determining what they are allowed to access or do |
Example 1: Corporate Office Access
Authentication: An employee swipes their badge at the building entrance. The system checks their identity—Are you who you say you are?
Authorization: That same employee may:
- Access only certain floors (e.g., Finance or HR)
- Not enter the executive suite or server room
Key Point: Authentication got them into the building; authorization restricts their access within the building.
Example 2: Enterprise Software Access (e.g., ERP or Salesforce)
Authentication: A manager logs in to the ERP system with a corporate email and password. MFA (multi-factor authentication) may confirm it’s really them.
Authorization: Depending on their role:
- The Finance Director can access P&L reports and budgets
- A Sales Rep can see only their own pipeline—not company-wide revenue
Key Point: Both users are authenticated, but role-based authorization controls what they can see and do in the system.
Example 3: Boardroom Access to Strategy Docs
Authentication: A board member logs into the company’s digital board portal using a secure login.
Authorization: They can:
- View board agendas and financials
- But not access internal audit working papers unless explicitly granted
Key Point: Even trusted users need explicit permissions—not all authenticated users are authorized for everything.
Executive Summary
Authentication is identity verification. Authorization is access control based on business roles, policies, and data sensitivity.
Both are essential to:
- Enforce zero trust principles
- Prevent data leaks or privilege misuse
- Ensure compliance with frameworks like SOX, GDPR, HIPAA, and FedRAMP
Introduction to OAuth 2.0 and OpenID Connect (OIDC)
In the modern digital landscape, users interact with dozens of applications and services—each often requiring authentication (confirming identity) or authorization (granting permission). To streamline and secure these interactions, two foundational protocols have emerged as industry standards: OAuth 2.0 and OpenID Connect (OIDC). This documentation page explores how OAuth 2.0 and OIDC work, the various ways applications can use them to request access (grant types), and the different kinds of tokens exchanged during the process. Whether you’re developing secure APIs, enabling third-party integrations, or implementing login via social identity providers, understanding these protocols is crucial for designing modern, secure applications.
What Are OAuth 2.0 and OIDC?
OAuth 2.0 is an open standard for delegated authorization. It allows one application (the “client”) to access limited resources or data on behalf of a user without requiring the user to share their login credentials. Originally published in 2012 by the Internet Engineering Task Force (IETF) through RFC 6749, OAuth 2.0 is now widely used by platforms like ActivePlatform™, Google, Facebook, and Microsoft.
OpenID Connect (OIDC) is a secure authentication protocol built on top of OAuth 2.0. Developed by the OpenID Foundation in collaboration with the IETF, OIDC allows client applications to verify a user’s identity and receive basic profile information through an ID Token, without managing user credentials directly.
Governing Organizations
- IETF (Internet Engineering Task Force) is the global standards body that defines OAuth 2.0. It focuses on open internet protocols and is responsible for specifying the behavior of clients, authorization servers, and resource servers.
- OpenID Foundation is a non-profit organization that develops and promotes OIDC. It extends OAuth 2.0 to include robust identity management capabilities.
Purpose and Use Cases
Together, OAuth 2.0 and OIDC address two core security challenges:
- Authorization: Can this app or service access specific data or perform certain actions on behalf of the user?
- Authentication: Is the user who they claim to be?
These protocols form the backbone of secure Single Sign-On (SSO) solutions, API access control, and federated identity systems.
Everyday Analogy
Imagine you’re checking in to a hotel:
- OAuth 2.0 is like receiving a room key card that grants access only to your room and maybe the gym—not the whole building. It’s limited access, granted with your permission.
- OIDC is like showing your government-issued ID at the front desk to prove who you are before receiving that key.
Below are the key OAuth2 and OIDC Concepts for ActivePlatform™.
PART 1: ORIGIN AND PURPOSE
OAuth 2.0 (Authorization Framework)
- Origin: Created in 2012, evolving from OAuth 1.0.
- Purpose: A protocol to delegate access without sharing passwords.
- Think of it as: Giving a valet a car key that only starts the engine—not opens your glovebox.
Example:
Imagine you want a third-party budgeting app to read your bank transactions. Instead of giving your actual bank login, OAuth 2.0 allows your bank to issue a limited-access token to the app that says:
“You can read John/Jane Doe’s transactions for 30 days, but you can’t move any money.”
OIDC (OpenID Connect – Built on OAuth 2.0)
- Origin: Finalized in 2014.
- Purpose: A layer on top of OAuth2 that provides authentication (i.e., identity verification).
- Think of it as: Not just giving the valet limited access to your car, but also confirming who the valet is and who you are when authorizing them.
Example:
You want to log in to a new website using your Google account. That’s OIDC in action:
The new site says: “Google, who is this person?” Google replies: “This is Jane Doe. Here’s a signed proof of their identity.”
PART 2: GOVERNANCE AND IETF’S ROLE
Internet Engineering Task Force (IETF)
Role: An open standards body responsible for creating and maintaining core internet protocols.
OAuth 2.0 is defined in:
- RFC 6749 (Core Spec)
- RFC 6750 (Bearer Tokens)
OIDC is developed and maintained by:
- OpenID Foundation — but it builds entirely on OAuth2 and collaborates with IETF.
Analogy:
- Think of the IETF like the World Health Organization for the internet. They don’t run hospitals (apps), but they define the protocols and safety standards (like OAuth2).
- The OpenID Foundation is like a specialized agency focusing only on identity.
PART 3: OAuth 2.0 GRANT TYPES (Ways to Get Access)
Grant types are different ways for clients to obtain access tokens, depending on the application type and use case.
| Grant Type | Real-Life Example | Description |
|---|---|---|
| Authorization Code | Logging in with Google on a new website | Most secure flow; used by apps with a backend. |
| PKCE (Proof Key for Code Exchange) | Mobile app logging into Spotify | Adds security to Authorization Code flow for mobile clients. |
| Client Credentials | Automated server talking to another server | No user; just apps talking (e.g., a billing system pulling data). |
| Resource Owner Password (Legacy) | User gives username+password in a POST Request | Deprecated for security reasons. |
| Refresh Token | Your app silently re-logs you in after session expiry | Lets the client refresh access tokens without user re-login. |
| Implicit (Deprecated) | Single Page App (SPA) gets token directly in URL | Now discouraged due to token leakage risk. |
PART 4: TOKENS IN OAUTH2 & OIDC
| Token Type | Purpose | Visible to | Format | Real-Life Comparison |
|---|---|---|---|---|
| Access Token | Grants access to a resource (e.g., user data) | Client, Resource Server | Opaque or JWT | A temporary guest pass to access specific areas |
| Refresh Token | Used to get a new access token | Client only | Opaque | A renewable pass, like a library membership card |
| ID Token (OIDC) | Carries identity info (e.g., name, email) | Client | JWT | A digital driver’s license that proves who you are |
PART 5: COMPARATIVE FLOW EXAMPLE
Scenario: You want to book a flight using a travel aggregator like Kayak.com, which pulls your flight info from your Gmail.
With OAuth2:
- You log in to Kayak.
- Kayak redirects you to Google: “Do you allow this app to read your flight emails?”
- You say yes.
- Google gives Kayak an access token that allows reading only flight-related emails.
- Kayak uses that token to show your flight details.
With OIDC (Login with Google):
- You click “Login with Google” on a new website.
- You’re redirected to Google, log in.
- Google returns an ID Token (JWT), signed and containing claims like your
email,name, andsub(subject ID). - The website trusts this token and lets you in.
🏁 Summary Table
| Feature | OAuth 2.0 | OIDC |
|---|---|---|
| Standard Type | Authorization Framework | Authentication Layer |
| Maintained by | IETF (RFC 6749) | OpenID Foundation |
| Main Purpose | Delegated access to resources | User identity verification |
| Tokens Used | Access Token, Refresh Token | Access Token, Refresh Token, ID Token |
| Protocol Flow | Authorization Grants | Authorization Grants + Identity Layer |
Final Analogy:
Imagine OAuth2 is the key system to rooms in a hotel — you get limited keys for limited access. OIDC is the photo ID that tells the hotel staff who you are.
Introduction to the OAuth 2.0 Authorization Code Grant
In the OAuth 2.0 framework, the Authorization Code Grant is the most widely recommended and secure method for delegating access to protected resources. It is specifically designed for applications that run on a server (backend) and can securely store sensitive credentials like a client secret.
What Problem Does It Solve?
The Authorization Code Grant allows a user to authorize a third-party application (called the client) to access their data stored on another service (called the resource server)—without sharing their username and password with that third-party application.
How Does It Work?
The flow separates user authentication (done via the browser and the identity provider) from token exchange (done directly between the client and the identity provider). It involves two key steps:
- The user logs in to the identity provider (like am2-0 or Okta), and the provider sends an authorization code to the client via the user’s browser.
- The client then exchanges that code for an access token by making a secure, server-to-server POST request to the identity provider.
This two-step exchange significantly reduces the risk of sensitive data exposure.
Why Is It More Secure Than Other Grants?
The Authorization Code Grant offers several important security advantages over older or simpler flows like Implicit or Resource Owner Password Credentials (ROPC):
| Security Feature | Benefit |
|---|---|
| No tokens in browser | Tokens are never exposed in the browser URL or local storage, reducing token leakage risk. |
| Server-to-server token exchange | Access tokens are exchanged via a secure backend connection, not the user’s browser. |
| Supports PKCE (Proof Key for Code Exchange) | Prevents intercepted authorization codes from being reused by attackers in mobile or SPA apps. |
| Client authentication (via secret or mTLS) | Ensures that only legitimate, trusted clients can complete the token exchange. |
| Redirection-based login | The user authenticates directly with the identity provider (e.g., am2-0/Okta), keeping their credentials private. |
Less Secure Alternatives (For Context)
| Grant Type | Risks |
|---|---|
| Implicit Grant | Exposes tokens in URL fragments and browser memory; deprecated by OAuth 2.1. |
| ROPC Grant | Requires users to give their username and password to third-party clients—breaking a core security principle. |
| Client Credentials Grant | Doesn’t involve user identity; used for machine-to-machine scenarios only. |
Analogy for General Audience
Think of it like this:
You want to let a travel app view your flight reservations from your email. Instead of giving the app your email password, you log in to your email provider (e.g., Google), which gives the app a one-time pass (authorization code). The app then goes behind the scenes to exchange this pass for an access badge (access token). At no point does the app ever see your login credentials.
Summary
The Authorization Code Grant is the most secure and flexible way to implement OAuth 2.0 for web and mobile applications. It keeps credentials and tokens secure, supports modern enhancements like PKCE, and aligns with current best practices recommended by the OAuth 2.1 specification.
Graphical Workflow
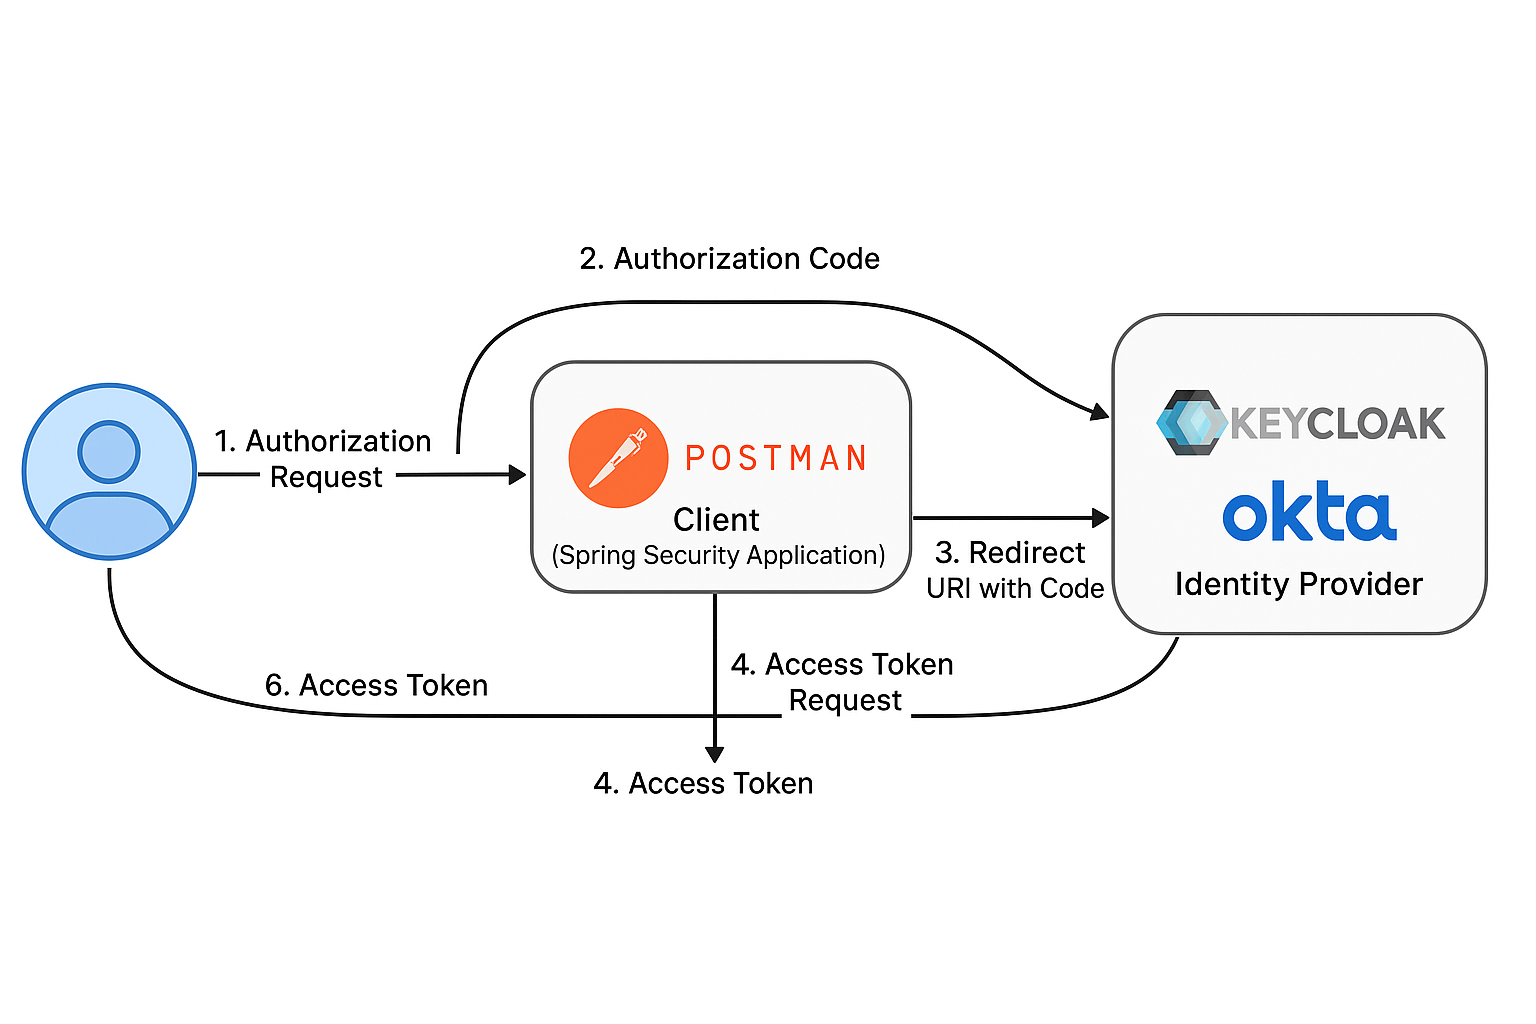
Below is a step-by-step explanation of the OAuth 2.0 Authorization Code Flow using:
- A Spring Security Client application (configured to authenticate via OAuth2)
- An Identity Provider such as Access Management 2.0 or Okta
- And using Postman to simulate the interaction with real HTTP request examples
Step-by-Step: OAuth2 Authorization Code Flow
Step 1: Authorization Request (User → Identity Provider)
The client (Spring app or Postman) redirects the user’s browser to the Identity Provider (e.g., Access Management 2.0) to request access.
Sample URL (GET Request):
GET https://idp.example.com/auth/realms/demo/protocol/openid-connect/auth
Query Parameters:
| Parameter | Example Value | Description |
|---|---|---|
response_type | code | OAuth2 expects code here |
client_id | spring-client-app | Registered client ID in the IdP |
redirect_uri | https://myapp.com/login/oauth2/code/oidc | Where to send the user after login |
scope | openid profile email | Requested permissions |
state | xyzABC123 | Used to prevent CSRF attacks |
code_challenge | S256-hash-of-code-verifier | (if using PKCE) |
code_challenge_method | S256 | (if using PKCE) |
Full Example:
https://idp.example.com/auth/realms/demo/protocol/openid-connect/auth?
  response_type=code&
  client_id=spring-client-app&
  redirect_uri=https%3A%2F%2Fmyapp.com%2Flogin%2Foauth2%2Fcode%2Foidc&
  scope=openid%20email&
  state=random123&
  code_challenge=abc123hashedValue&
  code_challenge_method=S256
Step 2: User Logs In (via Identity Provider UI)
User enters credentials (e.g., on am2-0 or Okta login screen), and upon successful login, the IdP redirects to the redirect_uri with an authorization code.
Step 3: Authorization Code Redirect (IdP → Client)
GET https://myapp.com/login/oauth2/code/oidc?code=abcde12345&state=random123
The code is a temporary, single-use string that must now be exchanged for tokens.
Step 4: Token Request (Client → Identity Provider)
Now, the client exchanges the authorization code for tokens by making a POST request to the token endpoint.
Endpoint:
POST https://idp.example.com/auth/realms/demo/protocol/openid-connect/token
Headers:
Content-Type: application/x-www-form-urlencoded
Authorization: Basic base64(client_id:client_secret)   ← or use `client_id` & `client_secret` in the body
Body (x-www-form-urlencoded):
grant_type=authorization_code
code=abcde12345
redirect_uri=https://myapp.com/login/oauth2/code/oidc
client_id=spring-client-app
client_secret=xyz-secret-value         ← optional for public clients
code_verifier=original-code-verifier   ← required if using PKCE
Step 5: Token Response (IdP → Client)
Sample JSON Response:
{
  "access_token": "eyJhbGciOiJIUzI1NiIsInR5cCI6IkpXVCJ9...",
  "refresh_token": "8xLOxBtZp8...",
  "id_token": "eyJhbGciOiJSUzI1NiIsImtpZCI6...",
  "token_type": "Bearer",
  "expires_in": 3600,
  "scope": "openid email profile"
}
Step 6: Use Access Token (Client → Resource Server)
The Spring client app uses the access_token to call protected APIs.
Example:
GET https://api.myapp.com/user/profile
Authorization: Bearer eyJhbGciOiJIUzI1NiIs...
The Spring Security backend automatically validates the JWT, extracts the user identity, and handles authorization.
Bonus: Use in Postman
You can simulate this in Postman by:
Authorization tab → Type:
OAuth 2.0Set:
- Auth URL:
https://idp.example.com/auth/realms/demo/protocol/openid-connect/auth - Token URL:
https://idp.example.com/auth/realms/demo/protocol/openid-connect/token - Client ID:
spring-client-app - Client Secret:
xyz - Scope:
openid profile email - Callback URL:
https://oauth.pstmn.io/v1/callback
- Auth URL:
Click Get New Access Token
Introduction to the OAuth 2.0 Authorization Code Grant With Proof Key Code Exchange (PKCE)
The Proof Key for Code Exchange (PKCE) extension enhances the security of the OAuth 2.0 Authorization Code Grant, particularly for public clients such as mobile apps and browser-based Single Page Applications (SPAs) that cannot securely store a client secret. Originally, the Authorization Code flow relied on a client secret to prevent authorization code interception attacks—but public clients have no secure way to keep that secret. PKCE addresses this by introducing a dynamic secret—a one-time code_verifier created by the client and hashed into a code_challenge, which is sent during the authorization request. When the client later exchanges the authorization code for tokens, it must prove possession of the original code_verifier. This prevents malicious apps or attackers from exchanging intercepted codes for tokens, even if they can observe the redirect. As a result, PKCE brings the security benefits of confidential clients to public clients—without requiring a client secret—making it the de facto standard for modern OAuth2 implementations across mobile and web applications.
Here’s a comprehensive step-by-step guide to understanding and implementing the OAuth 2.0 Authorization Code Grant with PKCE using:
- Access Management 2.0 as the Identity Provider (IdP)
- Mobile clients (Android/iOS) using third-party libraries
- Web clients (Angular/React) with frontend PKCE support
- Bonus: Addressing whether PKCE can be used with Spring Boot backend clients
PART 1: Access Management 2.0 Configuration for PKCE Clients
Step 1: Create the Client in Access Management 2.0 Admin Console
Login to Access Management 2.0 Admin Console
Go to Clients → Create
Set the following:
Client ID:
mobile-pkce-clientClient Type:
Public(very important — public clients do not use a client secret)Root URL / Redirect URI:
- For mobile: Use custom scheme (e.g.,
com.myapp://callback) - For web: Use the SPA URL (e.g.,
http://localhost:4200/callback)
- For mobile: Use custom scheme (e.g.,
Step 2: Configure Client Settings
In the Settings tab:
- Access Type:
public - Authorization Enabled: ❌ (unless using fine-grained scopes)
- Standard Flow Enabled: ✅
- Implicit Flow: ❌ (deprecated)
- Direct Access Grants: ❌ (optional)
- PKCE Enabled: ✅ (Access Management 2.0 automatically supports PKCE for public clients)
In Valid Redirect URIs:
com.myapp://callback
http://localhost:4200/*
In Web Origins (for SPAs):
http://localhost:4200
PART 2: Runtime Flow with PKCE
Step-by-Step PKCE Runtime Flow
This is common to all clients (mobile or SPA):
| Step | Description |
|---|---|
| 1 | Client generates a code_verifier (random string) and its hashed code_challenge |
| 2 | Client redirects user to Access Management 2.0 /auth endpoint with code_challenge and code_challenge_method=S256 |
| 3 | User logs in at Access Management 2.0 and is redirected back to app with code |
| 4 | Client POSTs to Access Management 2.0 /token endpoint with code and the original code_verifier |
| 5 | Access Management 2.0 verifies and responds with tokens (access_token, id_token, refresh_token) |
PART 3: Mobile Client (Android / iOS)
Android Example (using AppAuth for Android)
Step 1: Add dependency
implementation 'net.openid:appauth:0.11.1'
Step 2: Configure Auth Request
AuthorizationServiceConfiguration serviceConfig =
  new AuthorizationServiceConfiguration(
    Uri.parse("https://am2-0.example.com/auth/realms/demo/protocol/openid-connect/auth"),
    Uri.parse("https://am2-0.example.com/auth/realms/demo/protocol/openid-connect/token")
);

AuthorizationRequest request = new AuthorizationRequest.Builder(
  serviceConfig,
  "mobile-pkce-client",
  ResponseTypeValues.CODE,
  Uri.parse("com.myapp://callback")
)
.setCodeVerifier(generateRandomVerifier()) // automatically handles PKCE
.setScopes("openid", "profile", "email")
.build();
iOS Example (using AppAuth for iOS)
AppAuth for iOS works similarly, handles PKCE internally, and supports custom URL schemes for redirect.
PART 4: Angular / React SPA Clients
Angular (with angular-oauth2-oidc)
Step 1: Install
npm install angular-oauth2-oidc
Step 2: Configure
import { AuthConfig } from 'angular-oauth2-oidc';

export const authConfig: AuthConfig = {
  issuer: 'https://am2-0.example.com/auth/realms/demo',
  redirectUri: window.location.origin + '/callback',
  clientId: 'angular-client',
  responseType: 'code',
  scope: 'openid profile email',
  disablePKCE: false,
  showDebugInformation: true
};
Step 3: Initialize
oauthService.configure(authConfig);
oauthService.loadDiscoveryDocumentAndTryLogin();
React (with oidc-client-ts)
Step 1: Install
npm install oidc-client-ts
Step 2: Configure
import { UserManager } from 'oidc-client-ts';

const userManager = new UserManager({
  authority: 'https://am2-0.example.com/auth/realms/demo',
  client_id: 'react-client',
  redirect_uri: 'http://localhost:3000/callback',
  response_type: 'code',
  scope: 'openid profile email',
  loadUserInfo: true
});
❓ Can Spring Boot Clients Use PKCE?
Short Answer:
Technically yes, but it’s not the recommended use case.
- PKCE is meant for public clients (mobile or browser-based apps) that can’t safely store a client secret.
- Spring Boot is a confidential client and should use client authentication (via client secret or mutual TLS).
When Would You Use PKCE with Spring Boot?
You might use PKCE in Spring Boot only if:
- Your backend acts as a proxy for a public client (less common).
- You’re simulating SPA or mobile behavior in dev/testing.
But the recommended Spring Boot approach is:
spring:
  security:
    oauth2:
      client:
        registration:
          keycloak:
            client-id: my-spring-client
            client-secret: super-secret
            authorization-grant-type: authorization_code
            redirect-uri: "{baseUrl}/login/oauth2/code/keycloak"
        provider:
          keycloak:
            issuer-uri: https://am2-0.example.com/auth/realms/demo
Summary
| Client Type | Use PKCE? | Store Client Secret? | Recommended Grant |
|---|---|---|---|
| Mobile (iOS/Android) | ✅ Yes | ❌ No | Authorization Code with PKCE |
| SPA (Angular/React) | ✅ Yes | ❌ No | Authorization Code with PKCE |
| Backend (Spring Boot) | 🚫 No (optional for testing) | ✅ Yes | Authorization Code with client_secret |
Certainly. Here’s a detailed explanation of the OAuth 2.0 Client Credentials Grant, beginning with a high-level introduction and followed by step-by-step details of how it works.
Introduction to OAuth 2.0 Client Credentials Grant
The Client Credentials Grant is an OAuth 2.0 flow designed for machine-to-machine (M2M) communication, where the client application itself—not a user—authenticates directly with the authorization server to obtain access to protected resources. This grant is ideal for backend services, APIs, or automated scripts that need to communicate securely without involving human interaction.
Unlike other flows such as the Authorization Code Grant (which involves a user login), the Client Credentials Grant uses the client’s own credentials (typically a client_id and client_secret) to authenticate. The resulting access token represents the client’s identity and permissions, not that of a user.
How the Client Credentials Grant Works (Step-by-Step)
Prerequisites
The client is a confidential client (e.g., a backend service).
The client has been registered in the Identity Provider (e.g., Keycloak, Okta, or Auth0) with:
client_idclient_secret- Scopes and roles assigned to the client
The resource server trusts the Identity Provider and will validate access tokens issued to this client.
Step 1: The Client Makes a Token Request
The client initiates a POST request to the authorization server’s token endpoint.
HTTP Request
POST /realms/myrealm/protocol/openid-connect/token
Host: keycloak.example.com
Content-Type: application/x-www-form-urlencoded
Authorization: Basic base64(client_id:client_secret)
Body Parameters (form-urlencoded):
grant_type=client_credentials
scope=read:invoices write:invoices
Alternatively, instead of the Authorization header, the client ID and secret can be passed in the body:
client_id=my-service-client
client_secret=abc123xyz
Step 2: Identity Provider Verifies the Client
The authorization server (e.g., Keycloak):
- Validates the
client_idandclient_secret - Confirms the client is allowed to use the client_credentials grant
- Checks allowed scopes or roles (if configured)
Step 3: Identity Provider Issues Access Token
If validation succeeds, the server returns a response like this:
{
  "access_token": "eyJhbGciOiJSUzI1NiIsInR...",
  "expires_in": 300,
  "token_type": "Bearer",
  "scope": "read:invoices write:invoices"
}
No id_token or refresh_token is issued because there is no user context.
Step 4: Client Uses the Access Token to Call the Resource Server
The client now attaches the token to API calls:
GET /api/invoices
Authorization: Bearer eyJhbGciOiJSUzI1NiIsInR...
The resource server:
- Validates the token (typically using introspection or JWT verification)
- Grants or denies access based on scopes or roles encoded in the token
🧠 Use Case Examples
| Use Case | Description |
|---|---|
| Microservice A calling Microservice B | Service A authenticates with the Identity Provider to get a token to access B’s API |
| Background jobs | A scheduled task runs hourly and pulls data from a secure API |
| CI/CD Pipelines | A deployment script retrieves a token to push updates to a secured system |
Important Considerations
- No end-user context: Tokens represent the client, not a person.
- Should only be used by trusted applications that can securely store secrets.
- Best paired with mTLS or IP allowlisting for additional security.
- You cannot use refresh tokens with client credentials grant, since there’s no user session to refresh.
Summary
The Client Credentials Grant is a lightweight, efficient, and secure way for backend systems to authenticate and obtain access to protected APIs. It avoids user interaction entirely and is the go-to choice for system-level integrations within enterprise environments or cloud-based microservice architectures.
Feedback
Was this page helpful?