CUPS overview, setup, and best practices
CUPS is a modular printing system for Unix-like computer operating systems that allows a computer to act as a print server. A computer running CUPS is a host that can accept print jobs from client computers, process them, and send them to the appropriate printer.
Features
CUPS provides a way to decide and control which printers are accessible and used by Manhattan Active® Warehouse Management. Connectivity between the cloud-hosted Manhattan Active Warehouse Management and the on-premises CUPS server(s) is private and secured by firewalls. Customer printer configuration, physical printers, and printer network connectivity are independent of Manhattan Active Warehouse Management.
Setup
Scripts are provided to automate the CUPS provisioning for RHEL (Redhat) and DEBIAN Unix distributions. Instructions are provided below for each case, depending on which OS is selected. All documents mentioned in the below steps are included in the ZIP files provided. It is required that there be 2 CPUs and 32Gb memory for each cups server that is being provisioned.
Install on RHEL VM
RHEL 8 or 9 is recommended:
Create a RH Linux VM and make sure that it has internet access.
Create a directory (e.g., cups_setup) on the VM.
Put cups_cfg.sh, cupsd.conf, and cups-browsed.conf in the directory which was created in step 2.
Log on to the VM, and execute the command below under the directory created in step 2.
a. sh ./cups_cfg.sh
b. * Note: This may take 20 minutes or longer upon the number of packages to install to bring the OS up to date.
Once step 4 is completed, the “/etc/cups” directory is created, and the original CUPS configuration files are backed up as follows:
a. cupsd.conf => cupsd.conf-orig
b. cups-browsed.conf => cups-browsed.conf-orig
Execute the command below to verify the CUPS server is up and listening the port 631
a. # netstat -tulpn | grep 631
tcp   0   0 0.0.0.0:631   0.0.0.0:*  LISTEN   18031/cupsd

tcp6  0   0 :::631        :::*       LISTEN   18031/cupsd

udp   0   0 0.0.0.0:631   0.0.0.0:*           18041/cups-browsed
Test Web-UI access as follows:
a. For HTTP:
i. http://<host-name or IP>:631b. For HTTPS:
i.  In “cupsd.conf”, uncomment "Encryption Required”

ii.  https://<host-name or IP>:631
Rhel VM Documents: rhel.zip
Install on a Debian VM
Create a Debian VM and make sure that it has internet access.
Create a directory (e.g., cups_setup) on the VM.
Put cups_cfg.sh, cupsd.conf, and cups-browsed.conf under the above directory on the VM.
Log on to the VM, and execute the command below under the directory created in step 2.
a. bash ./cups_cfg.sh
b. * Note: This may take 20 minutes or longer upon the number of packages to install to bring the OS up to date.
Once step 4 is completed, the “/etc/cups” directory is created, and the original CUPS configure files are backed up as follows:
a. cupsd.conf => cupsd.conf-orig
b. cups-browsed.conf => cups-browsed.conf-orig
Execute the command below to verify the CUPS server is up and listing the port 631
a. # netstat -tulpn | grep 631
tcp   0   0 0.0.0.0:631   0.0.0.0:*   LISTEN   18031/cupsd

tcp6  0   0 :::631        :::*        LISTEN   18031/cupsd

udp   0   0 0.0.0.0:631   0.0.0.0:*            18041/cups-browsed
Test Web-UI access as follows:
a. For HTTP:
i. http://<host-name or IP>:631b. For HTTPS:
 i.  In “cupsd.conf”, uncomment "Encryption Required”

 ii.  https://<host-name or IP>:631
Debian VM Documents: debian.zip
Initial Printer Configuration
Log on CUPS Web-UI: http://<CUPS-server>:631
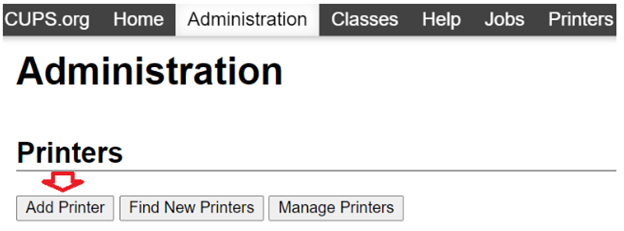
Navigate to the Administration Tab and “Add Printer”
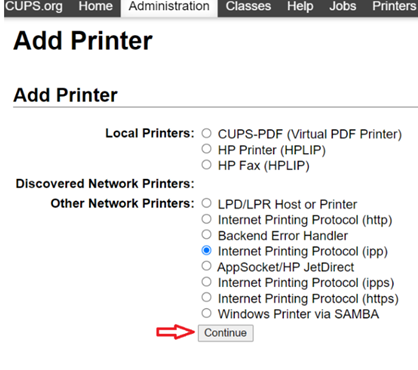
- Select a printer protocol (IPP or IPPS) and continue.
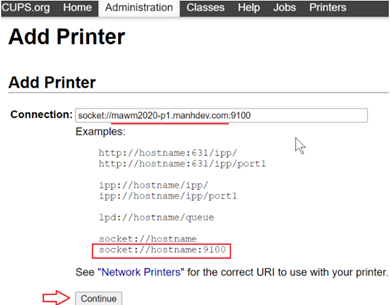
- For a label printer, change the socket to the following and continue:
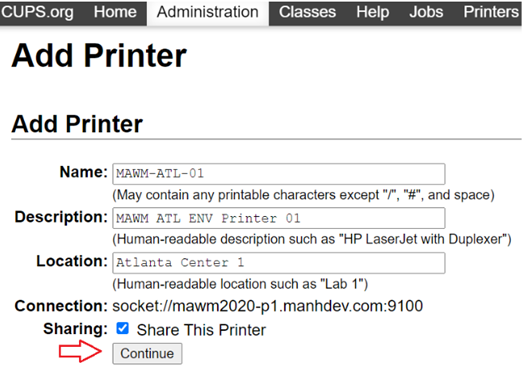
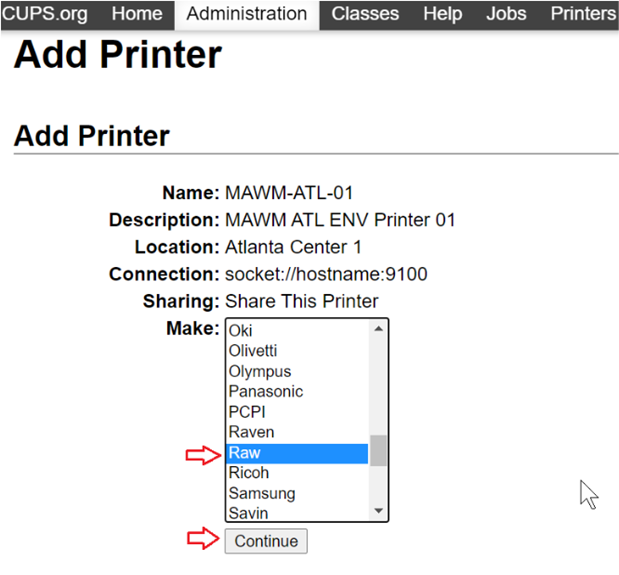
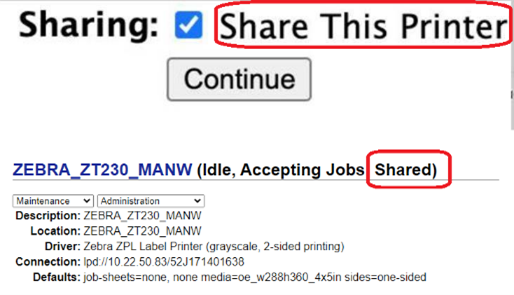
- Fill in the information below and check “Share This Printer”
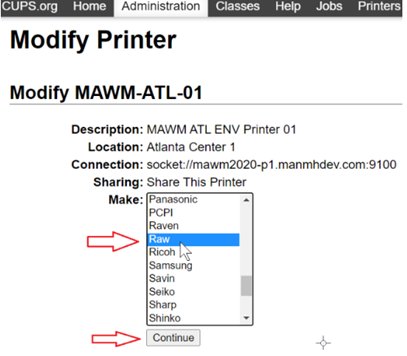
- For label printing, select “Raw” and continue.
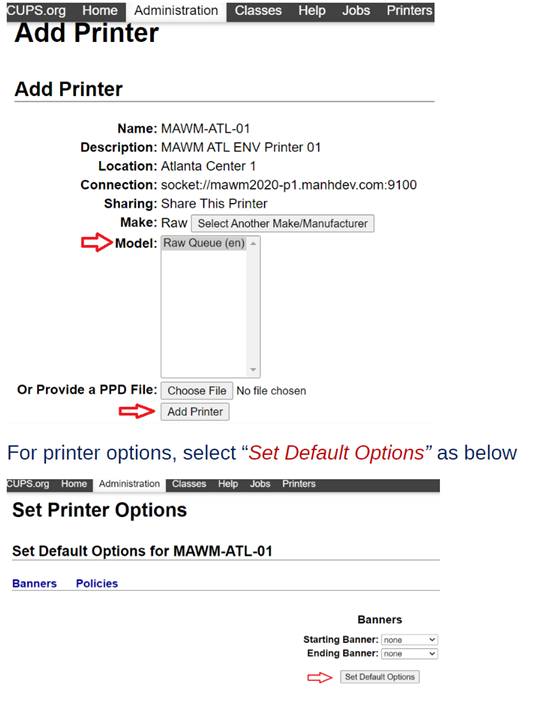
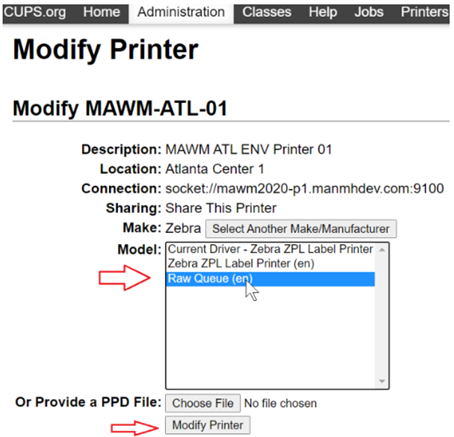
- Select Model as “Raw Queue”, and add a printer with default options:
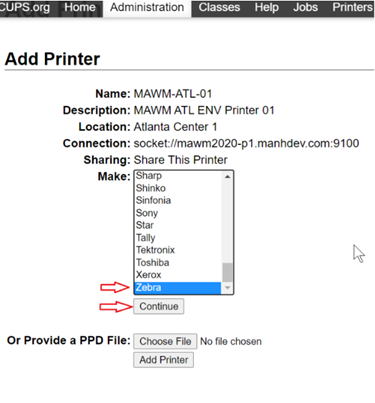
- For testing select “Zebra” instead of “Raw”
- Select “Zebra ZPL Label Printer” and set it to the default options
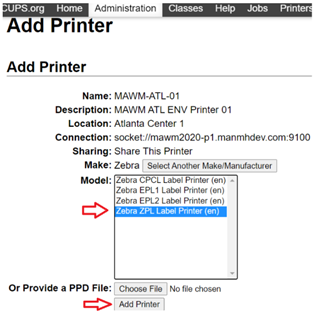
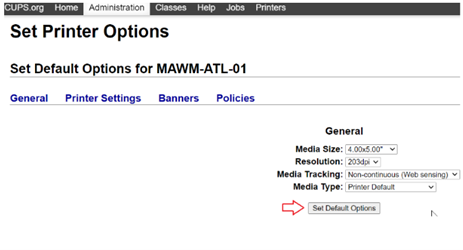
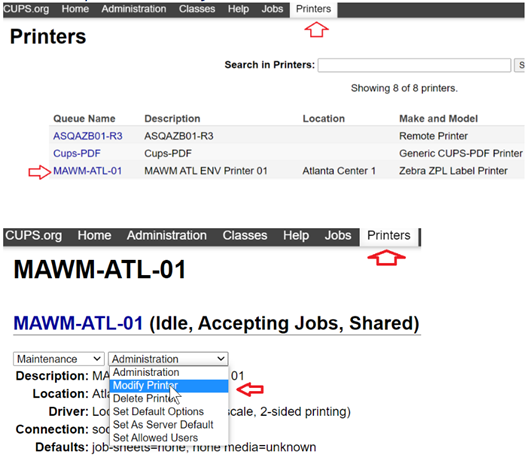
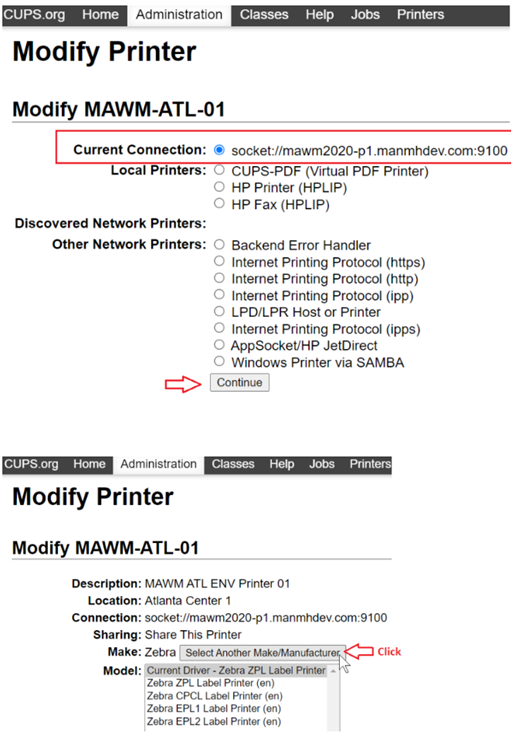
- Modify a given printer from Zebra to Raw after testing
Testing and Troubleshooting
Connection testing for Network and firewall:
a. telnet <IP:port>
b. nc -vz <IP:port>
c. curl http://<cups-server-name>:631/printers
d. Run the script provided in the setup ZIP files above “simple_web.sh” to start a web server on CUPS and test the connection
Test CUPS printing server access:
a. Get Access:
i.  curl http://<cups-server-IP>:631 OR

ii.  curl http://<cups-server-name>:631
b. List Printers/Queues on CUPS server
i. curl get <cups-server-IP>:631/printers.Test printing jobs from the command line:
a. echo “Hello world! " | lp -d <printer-queue-name> -h <cups-server-ip>:631
Test Printing jobs on a printer directly:
a. Using Bash:
i. cat /path/to/file > /dev/tcp/<printer-IP>/<port>b. Using Netcat:
i. cat file-to-print | nc -w 1 <printer_ip> <port>Retrieve CUPS logs from sys-log (This step required root privilege):
a. journalctl -u cups -e
Take tcp-dump:
a. tcpdump -i any <host source-IP> and port 631 -w /tmp/cups-tcpdump.pcap OR
b. tcpdump -i any dst <dst-ip> and src <src-ip> and dst port 631 -w /tmp/cups-tcpdump.pcap
Best Practices and Recommended Settings
It is possible to hit the maximum number of jobs in the print server during wave runs. To avoid this, the following can be set:
MaxJobs = 2000 (Default is 500 and 0 is (Unlimited))
PreserveJobHistory=Off
PreserveJobFiles=Off
Setting PreserveJobHistory and PreserveJobFiles to off prevents issues due to disk size because of the updated config on MaxJobs.
The following configurations are recommended to mitigate connectivity issues between Manhattan Active Warehouse Management and the CUPS server:
DefaultAuthType = None
Printer Shared for Remote printing = Enabled
Restricted IP Source Allow Edge VPC CIDR
a. Check the cupsd.conf file to ensure that the Edge VPC IP is an allowed host.
Configure the ServerAlias with the hostname in the cupsd.conf file.
Author
- Srinivasan Kalpathi Mahadevana: Architect, Technology Services, PSO.
Feedback
Was this page helpful?