Configure Azure Entra ID SAML 2.0 IdP for JIT & Non JIT
Objective
This page describes the Microsoft Entra ID SAML 2.0 setup with JIT and Non JIT flows.
It has a detailed step-by-step guide for registering an enterprise SAML 2.0 application in Microsoft Entra ID as an Identity Provider and configuring Access Management 2.0 as a Service Provider (SP) to enable SAML-based identity federation.
Introduction
Configuring Microsoft Entra ID as Identity Provider (IdP) with Access Management 2.0 (AM 2.0) as Service Provider (SP) using SAML 2.0 protocol.
This documentation provides a comprehensive guide to setting up and configuring Microsoft Entra ID (formerly Azure Active Directory) as the IdP and Access Management 2.0 as the SP using SAML 2.0 protocol. This setup enables secure single sign-on (SSO) capabilities for enterprise applications while leveraging the robust identity and access management features of Microsoft Entra ID and the flexibility of AM 2.0.
Additionally, this guide covers the implementation of Just-In-Time (JIT) provisioning, which automatically creates user accounts in Access Management 2.0 as they log in, streamlining user management and enhancing operational efficiency.
Before You Begin
You will need access to the ActivePlatform™ solution and a System:SystemAdministrator or System:KeycloakAdministrator role to be able to configure security properties in the AM 2.0.
To check your access in the administration UI, go to your AM 2.0 URL (https://<unique_id>-auth.<domain_name>/auth/admin/maactive/console/) and login. Administration UI will look something like this:

Note: The panel is accessible only to the users with System:SystemAdministrator or System:KeycloakAdministrator role.
Steps to achieve AM 2.0 integration with Microsoft Azure
There are 2 ways to achieve this integration. First way is simpler one using the REST API for making the configurations on AM 2.0 side. The second one is manually creating it using AM 2.0 admininstration UI. In both scenaios, configuration on Azure is still to be done manually.
Step 1: Create a New Enterprise Application in the Azure portal
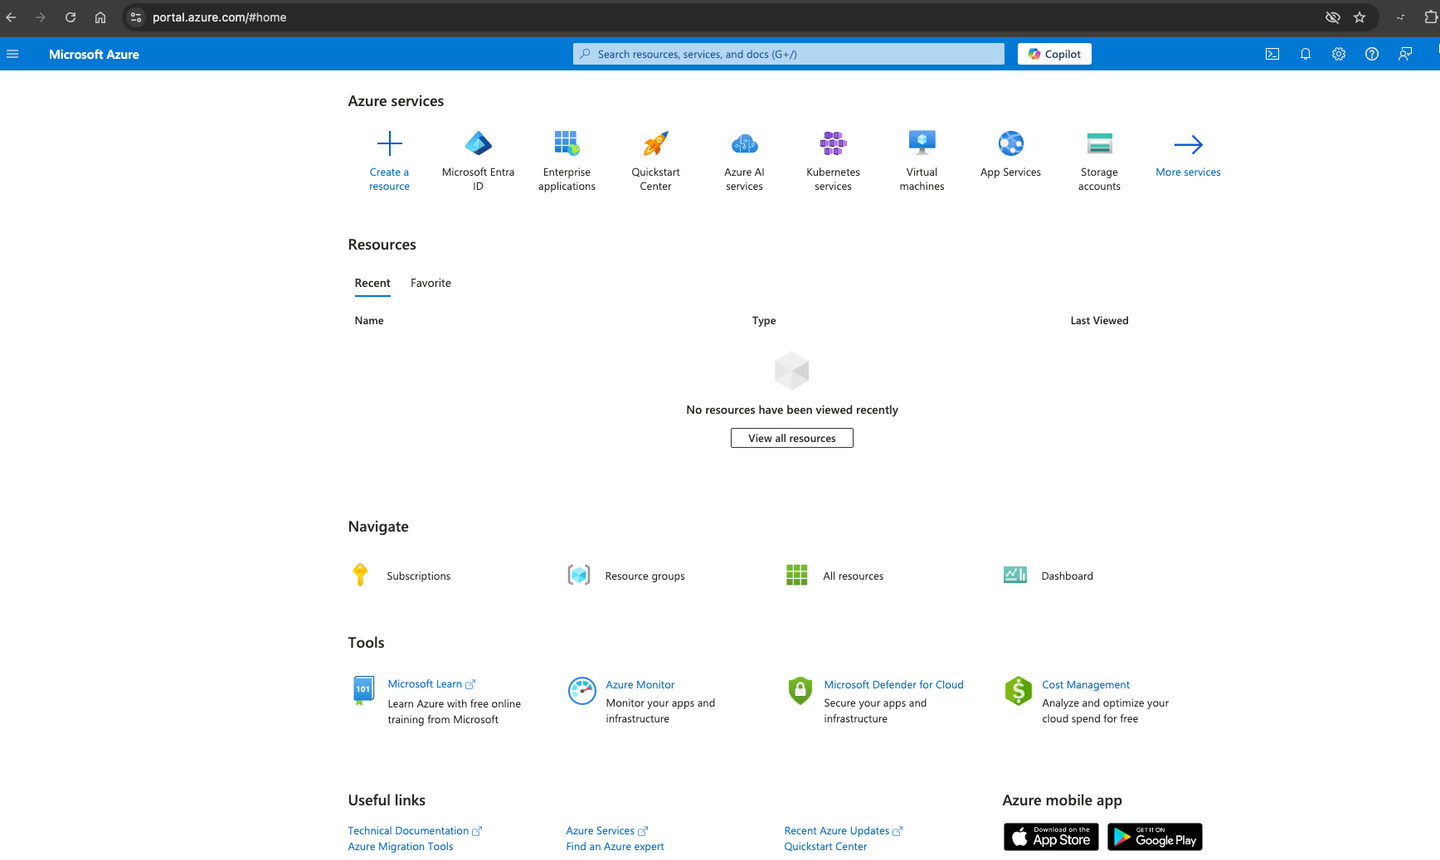
Navigate to the Azure Portal.
Sign in using an account with administrative permissions for Microsoft Entra ID.
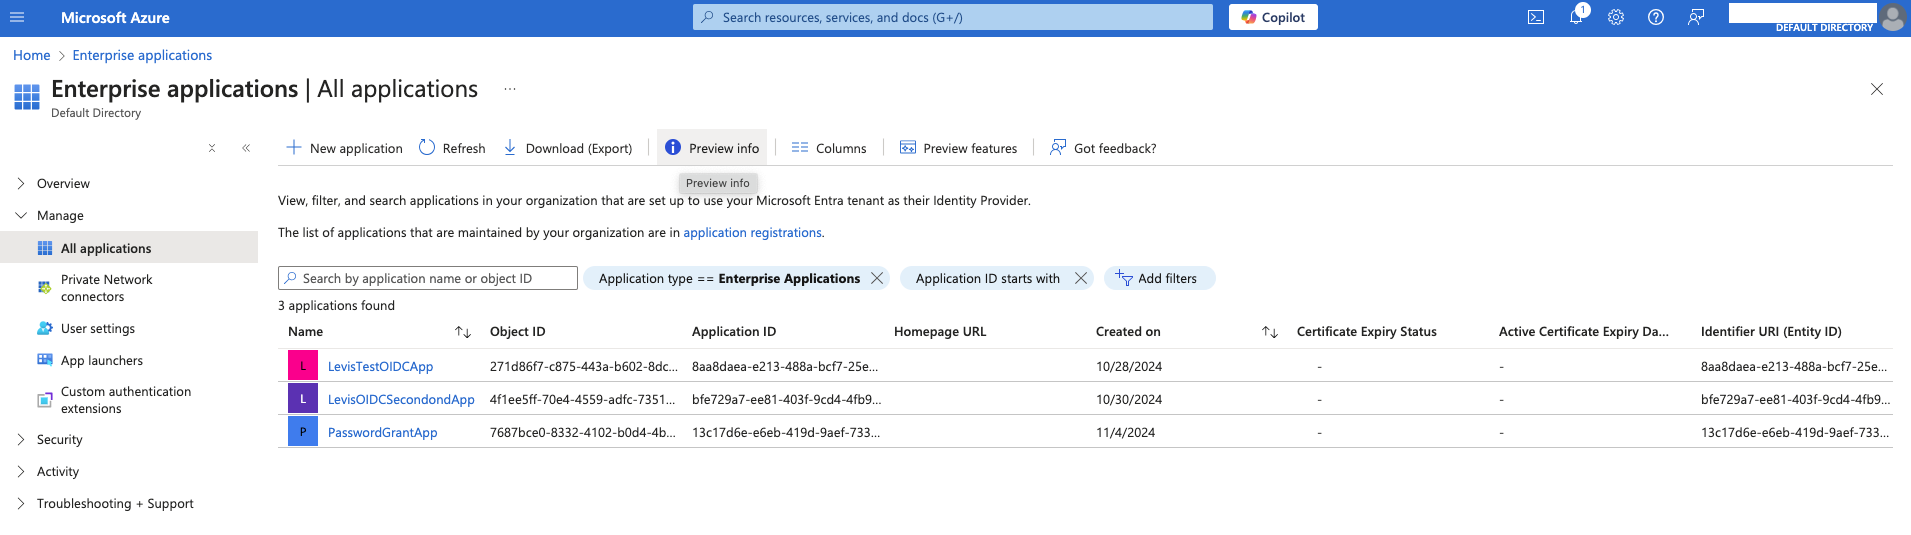
Click on the Enterprise Application icon.
Click on New Application.
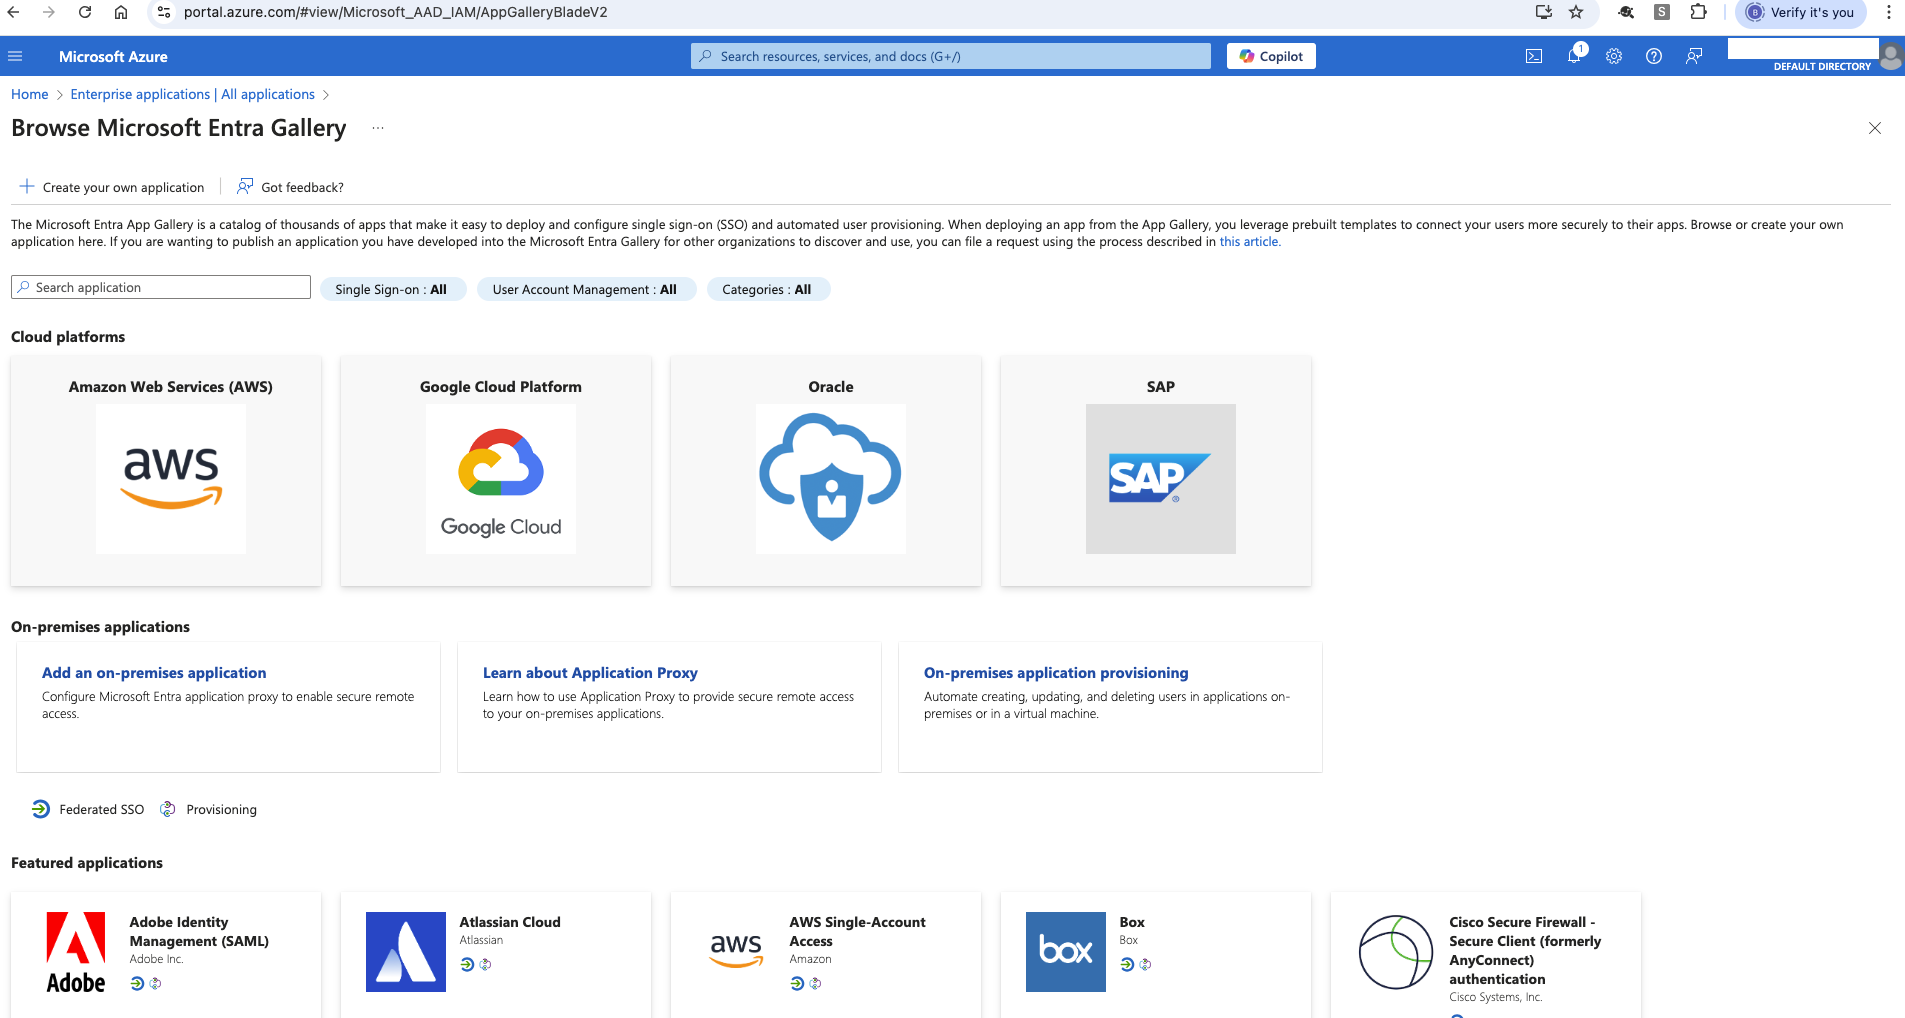
Click on Create your own application.
Give a name to your application.
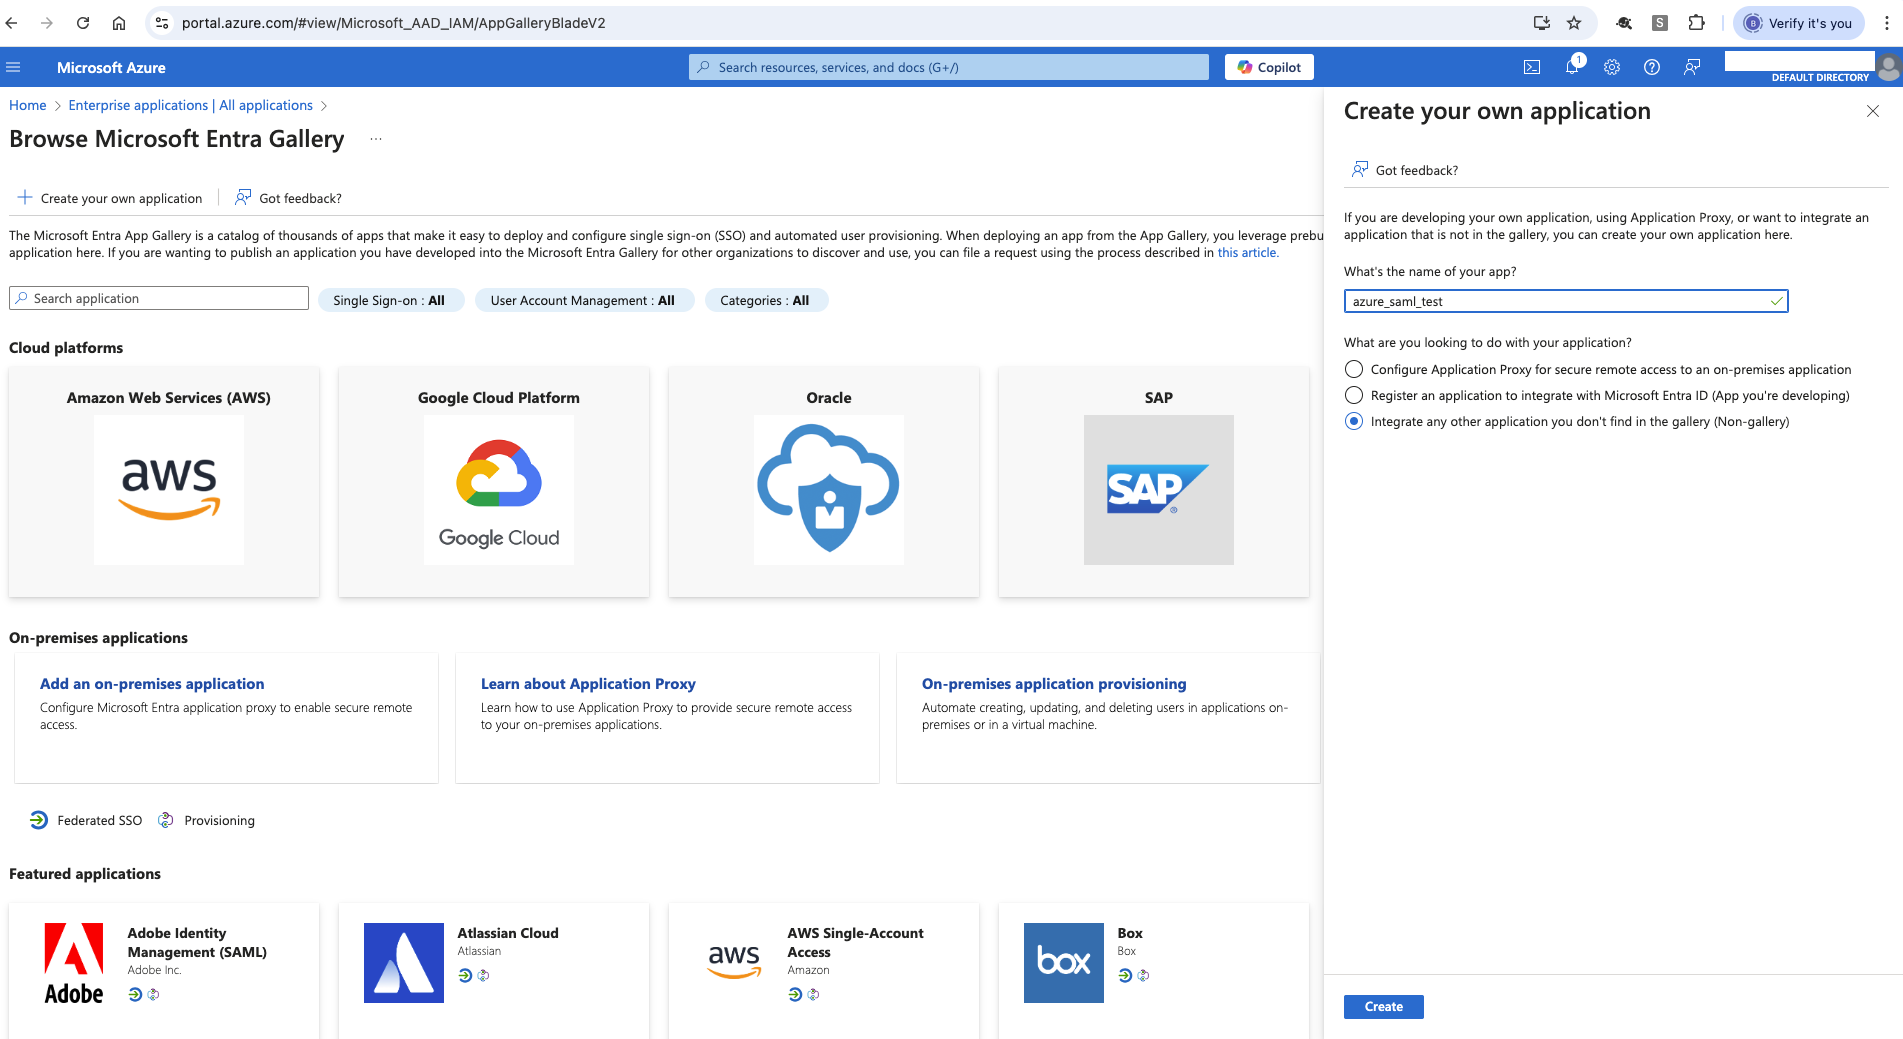
Select Integrate any other application you don’t find in the gallery (Non-gallery application) radio button.
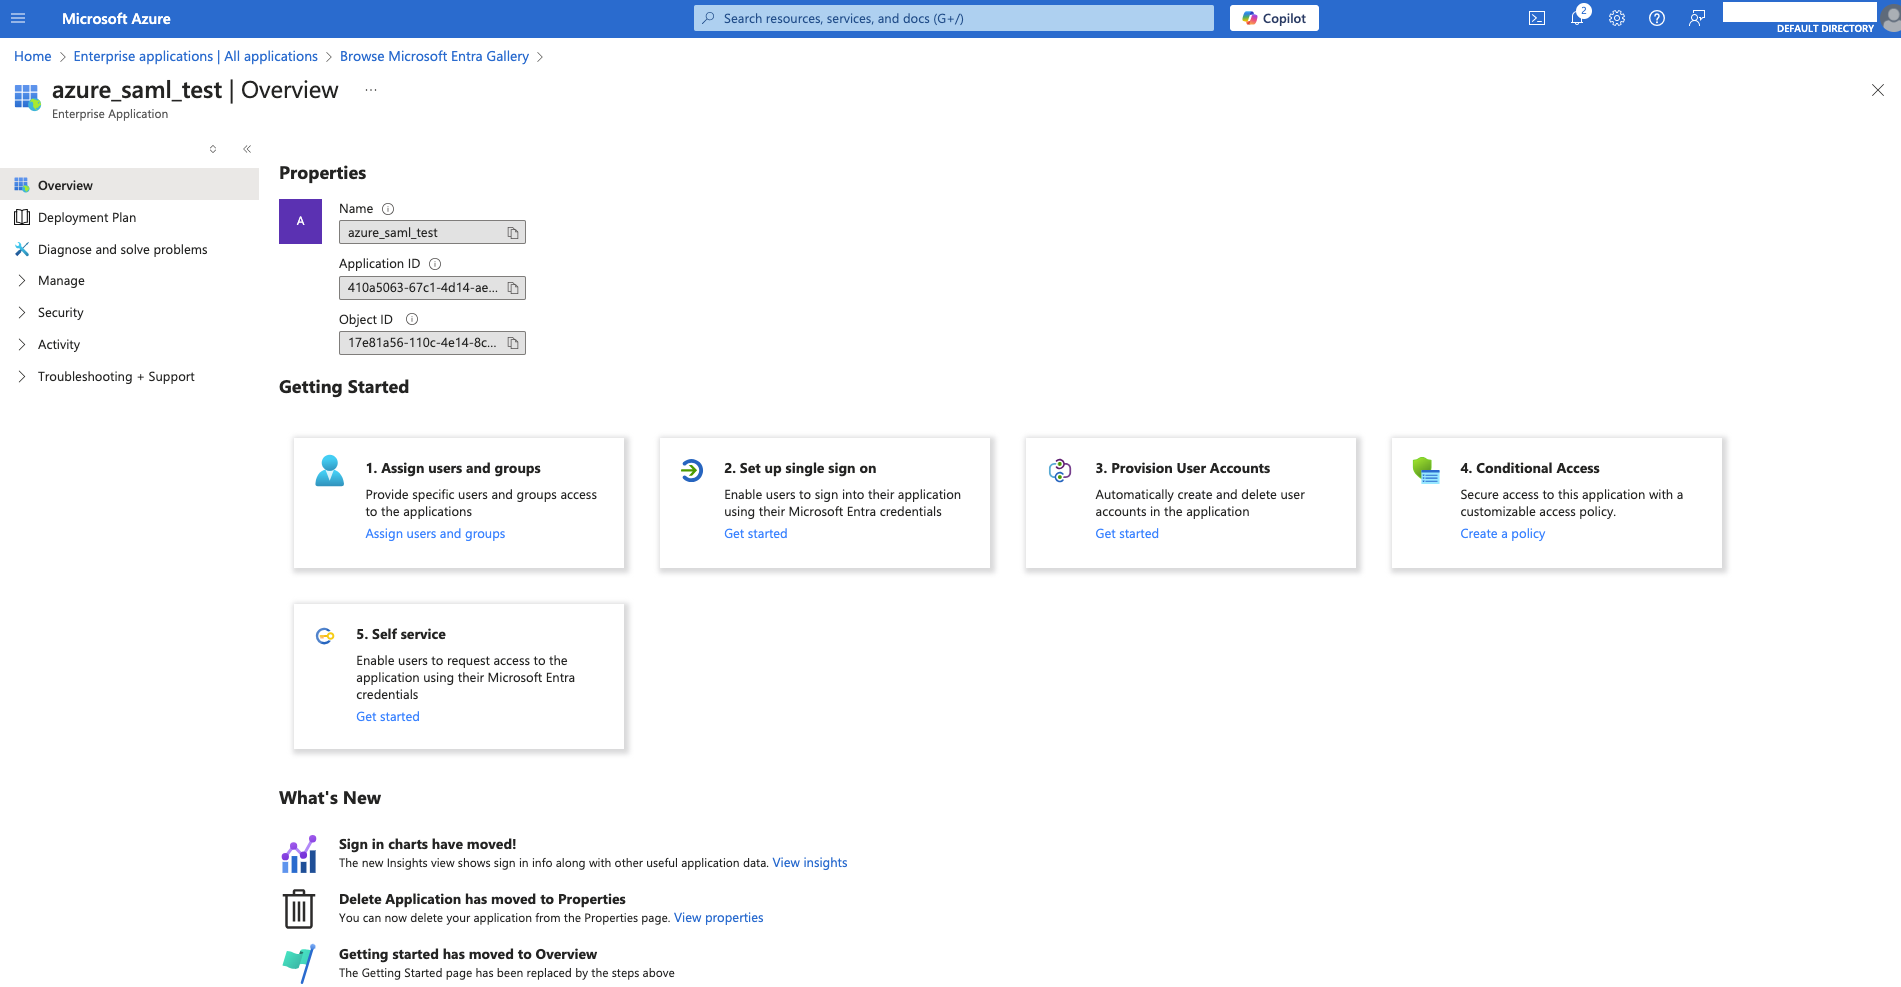
Click Create. This creates a basic SAML application in the Azure portal and now you will land on its overview page.
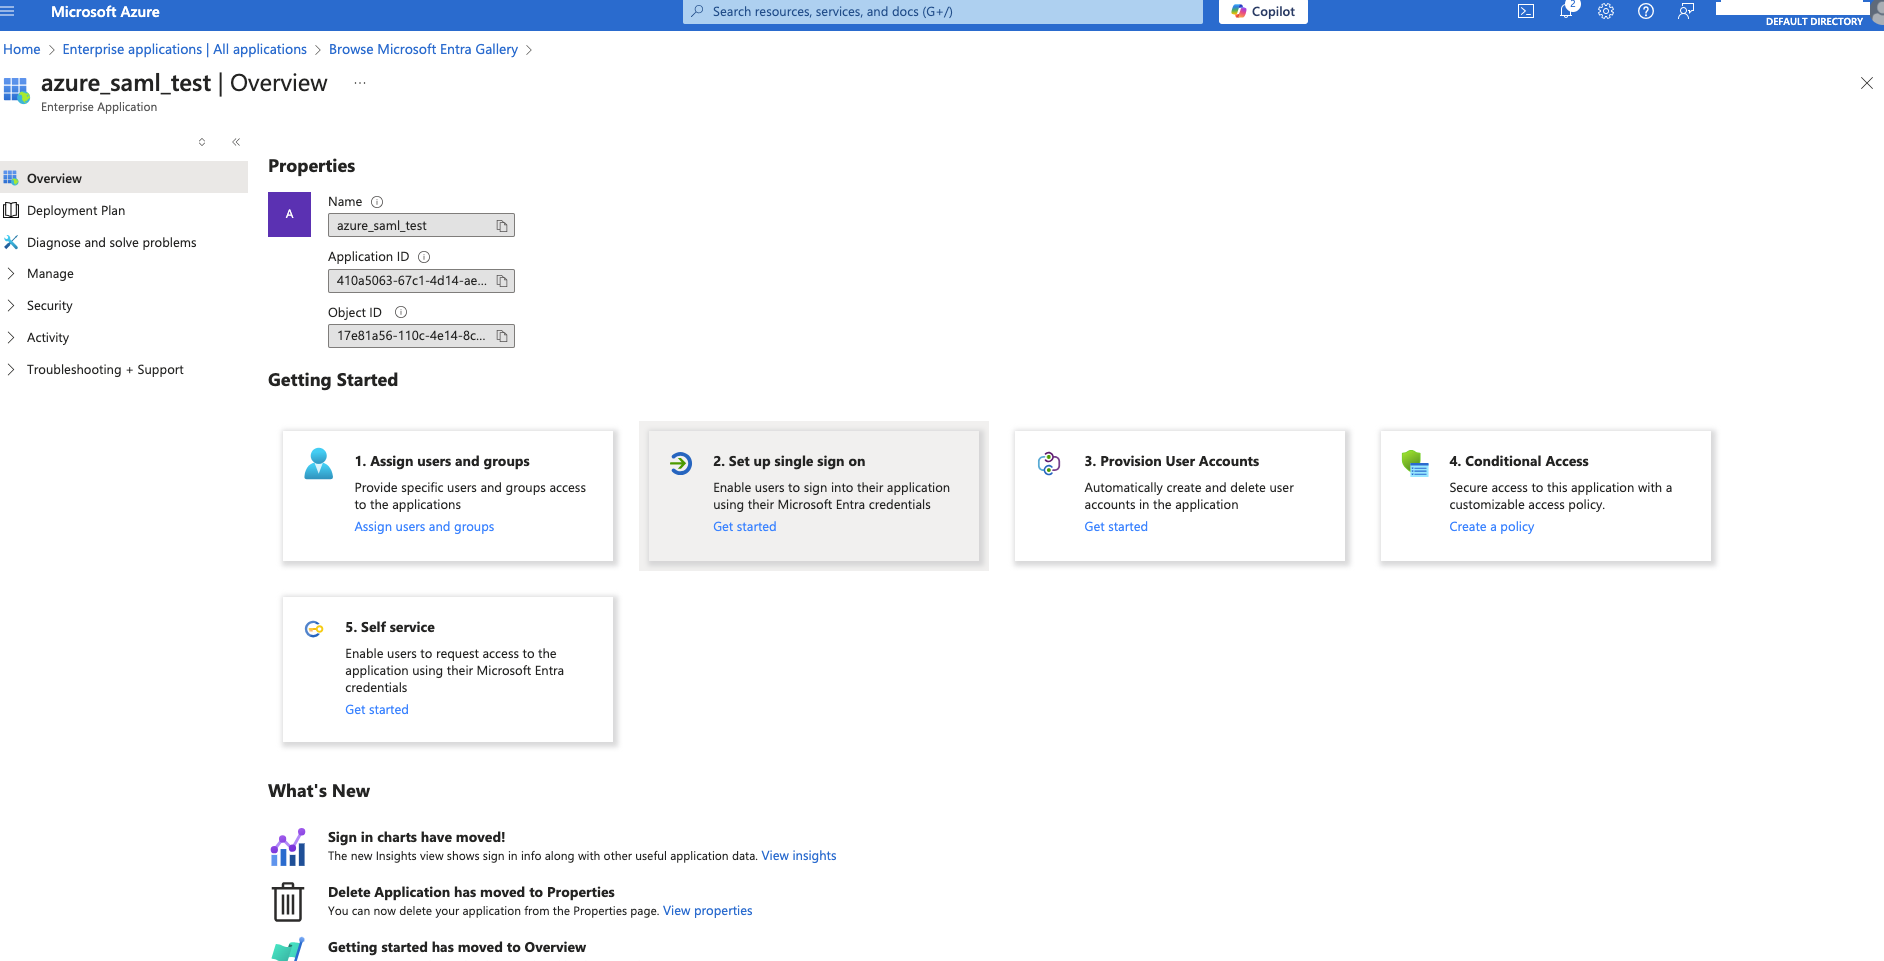
After the application is created, click on Set up single sign-on tile.
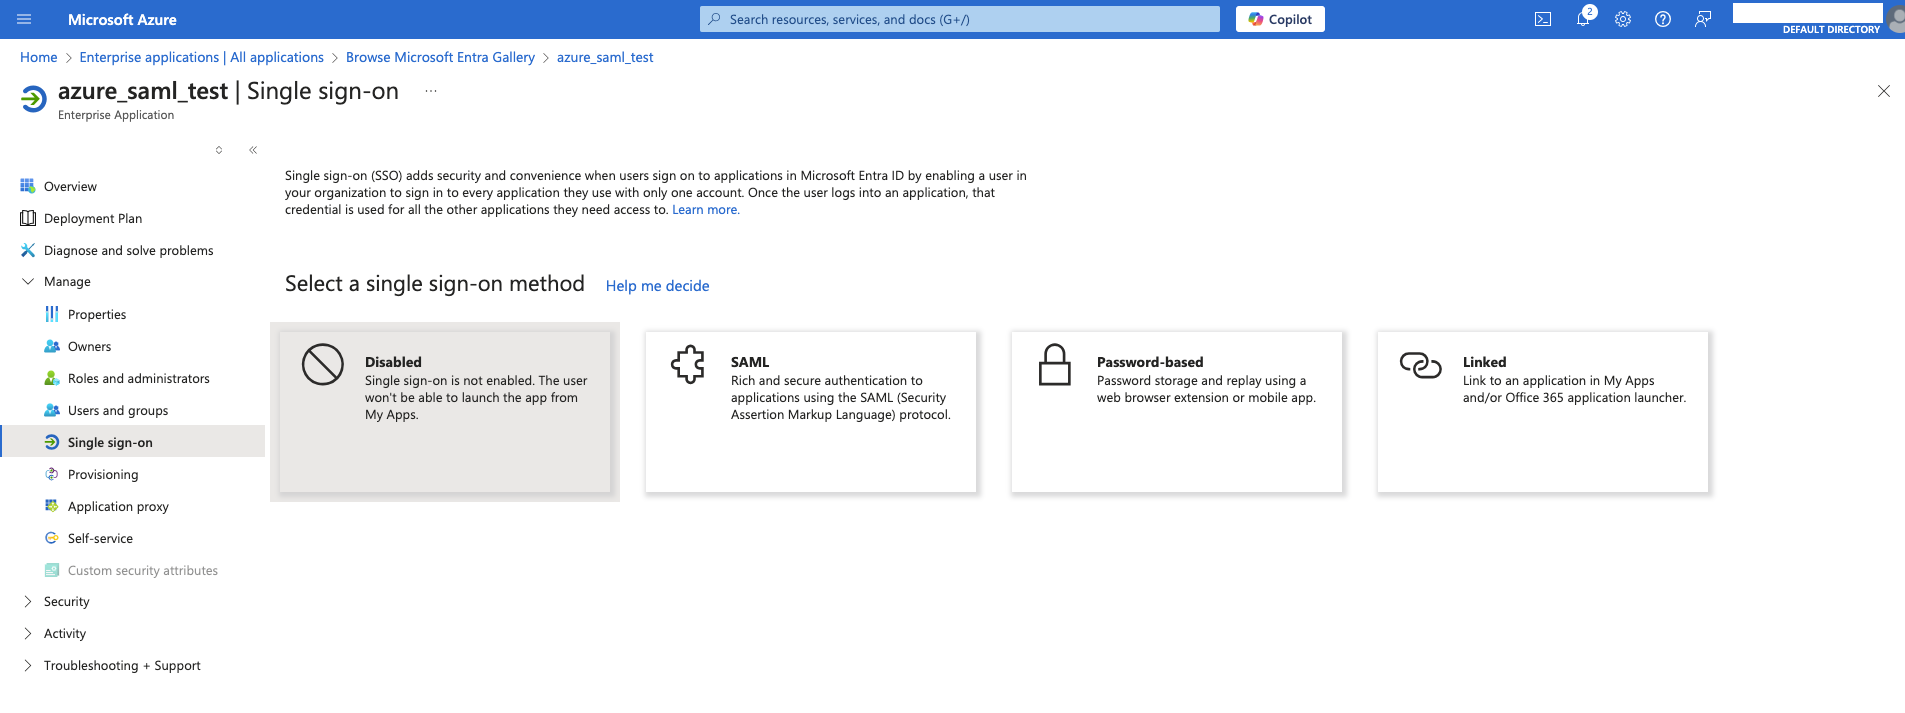
Select SAML as the single sign-on method.
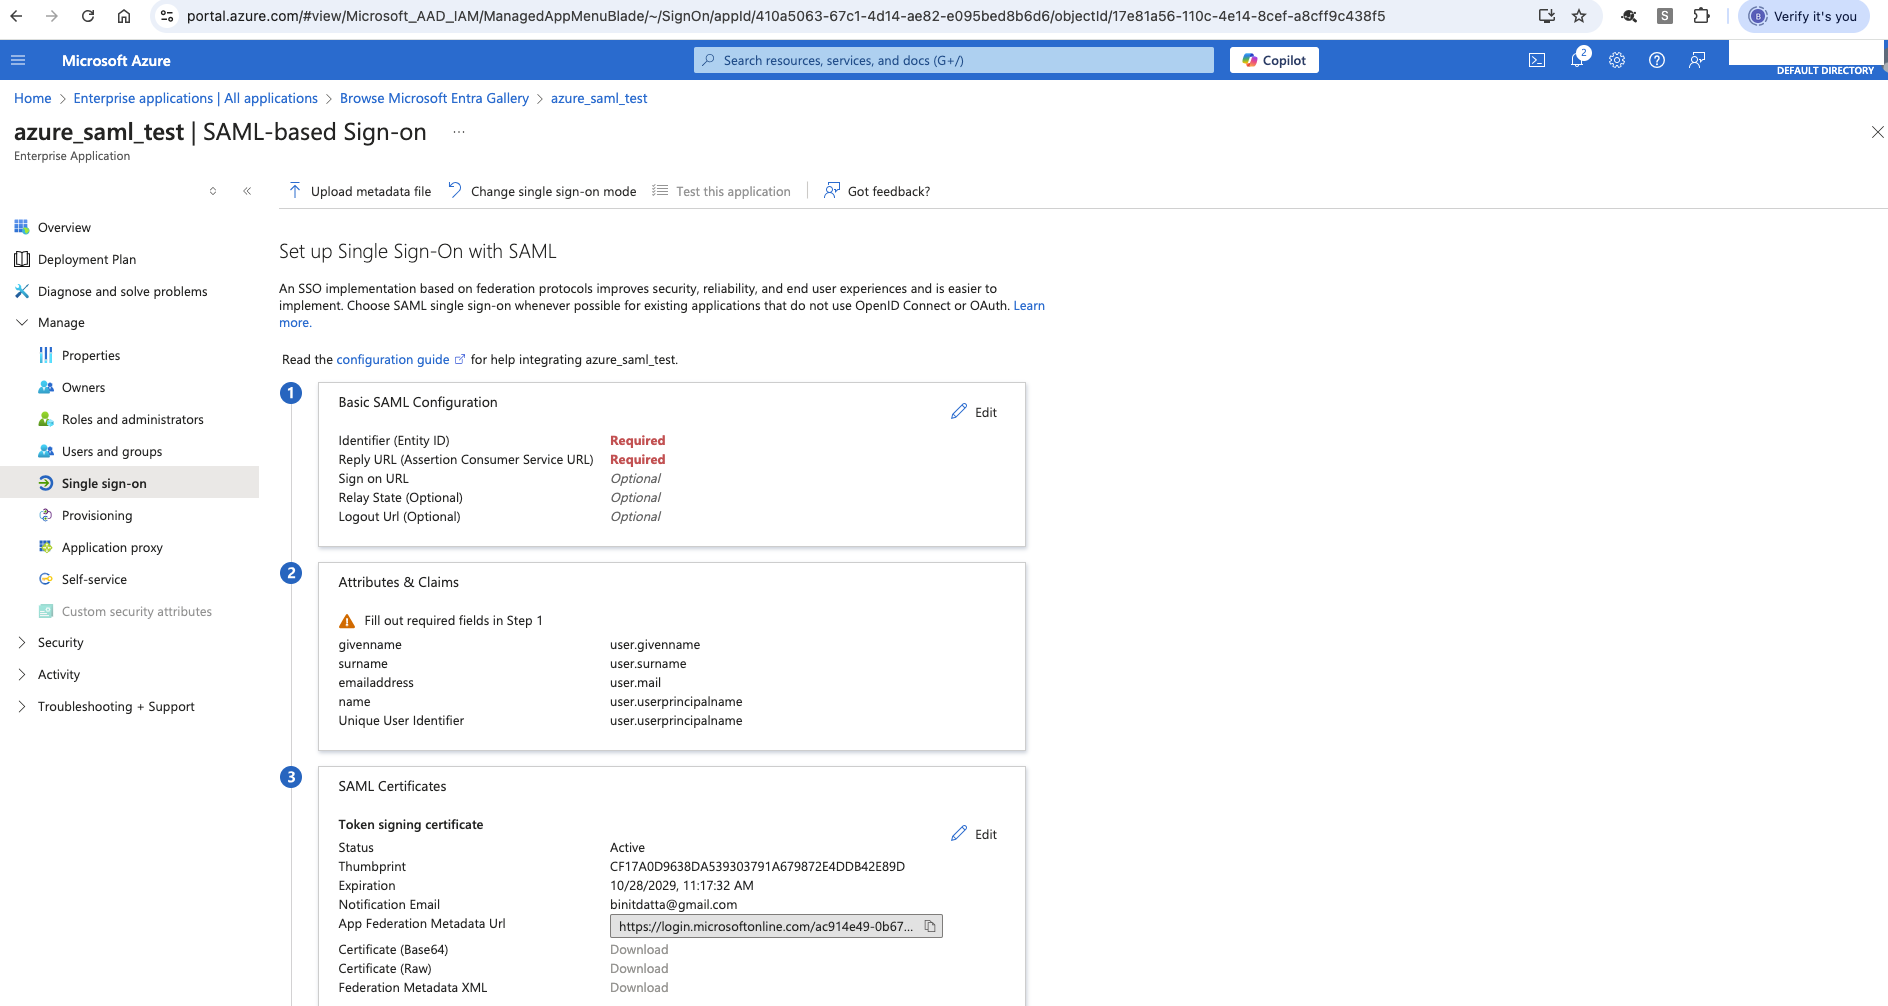
- In the SAML Certificates tile, you will be able to see the App Federation Metadata URL field which has IDP metadata. Keep this URL handy for step 2.
Step 2: Create an IDP config in the AM 2.0 portal
There are 2 ways to create this config on AM 2.0 side. First way is much easier and a recommended approach using the REST API. The second one is manually creating it using AM 2.0 admininstration UI.
I. Creating IDP config using REST API
In case of taking this approach, the REST API will take care of all the configuration that is needed on AM 2.0 side, except for any required customizations. You can skip steps 4, 6, 8 when using this approach.
For request details, prerequisites, supported parameters, response codes, and usage examples, refer to the Create IDP Using Custom REST API documentation
II. Creating IDP config using AM 2.0 UI
This is a slightly longer procedure and is not the recommended approach, owing to chances of manual errors.
Login to AM 2.0 Admin Console. Select the maactive realm.
Note: In case you have Restricted Admin Access on AM 2.0, then use this URL:
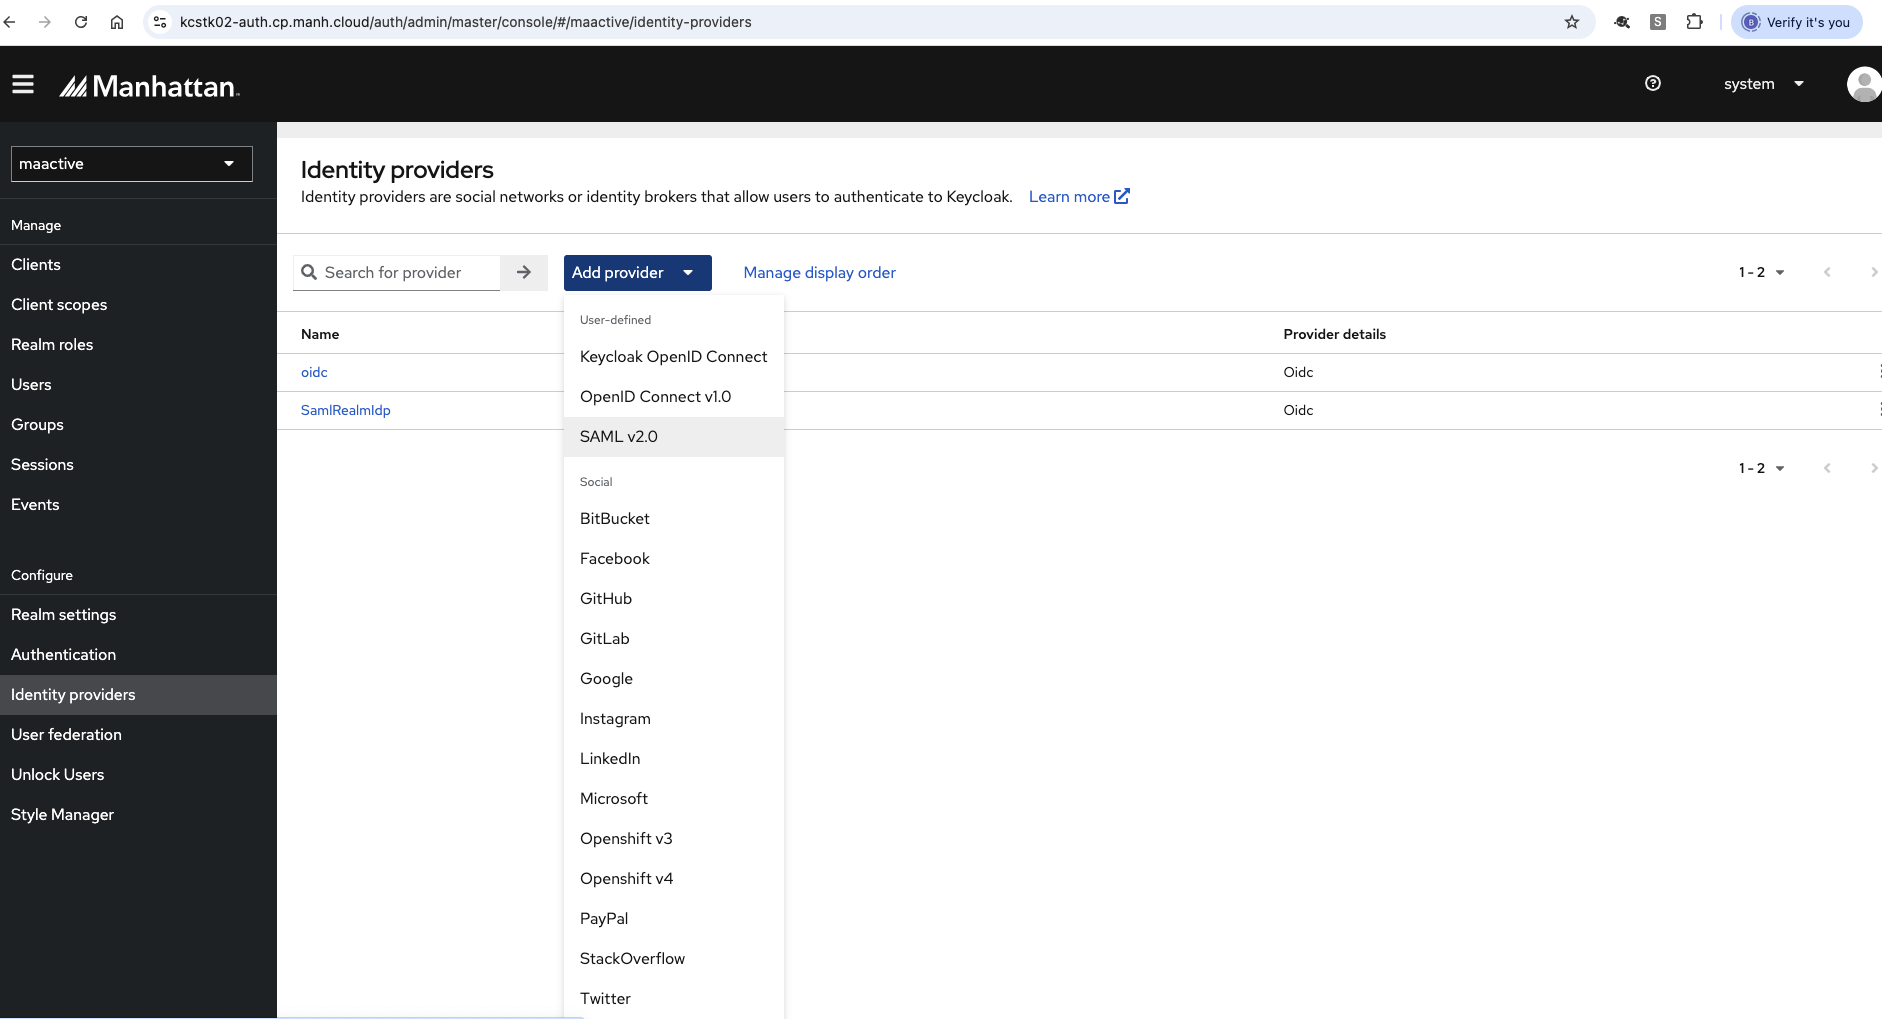
https://<stack_name>-auth.<domain_name>/auth/admin/maactive/console/Click on the Identity Providers option from the left panel and select SAML v2.0 from the drop-down.
Enter the Alias. This will be the default display name on the login page.
Please note that the Alias forms a part of the redirect URL. In case it does not reflect, you can create the Redirect URI yourself and keep the URL handy.
Eg. if Alias is set as - samlazure
Redirect URI -https://localdocker:8443/auth/realms/sample/broker/samlazure/endpoint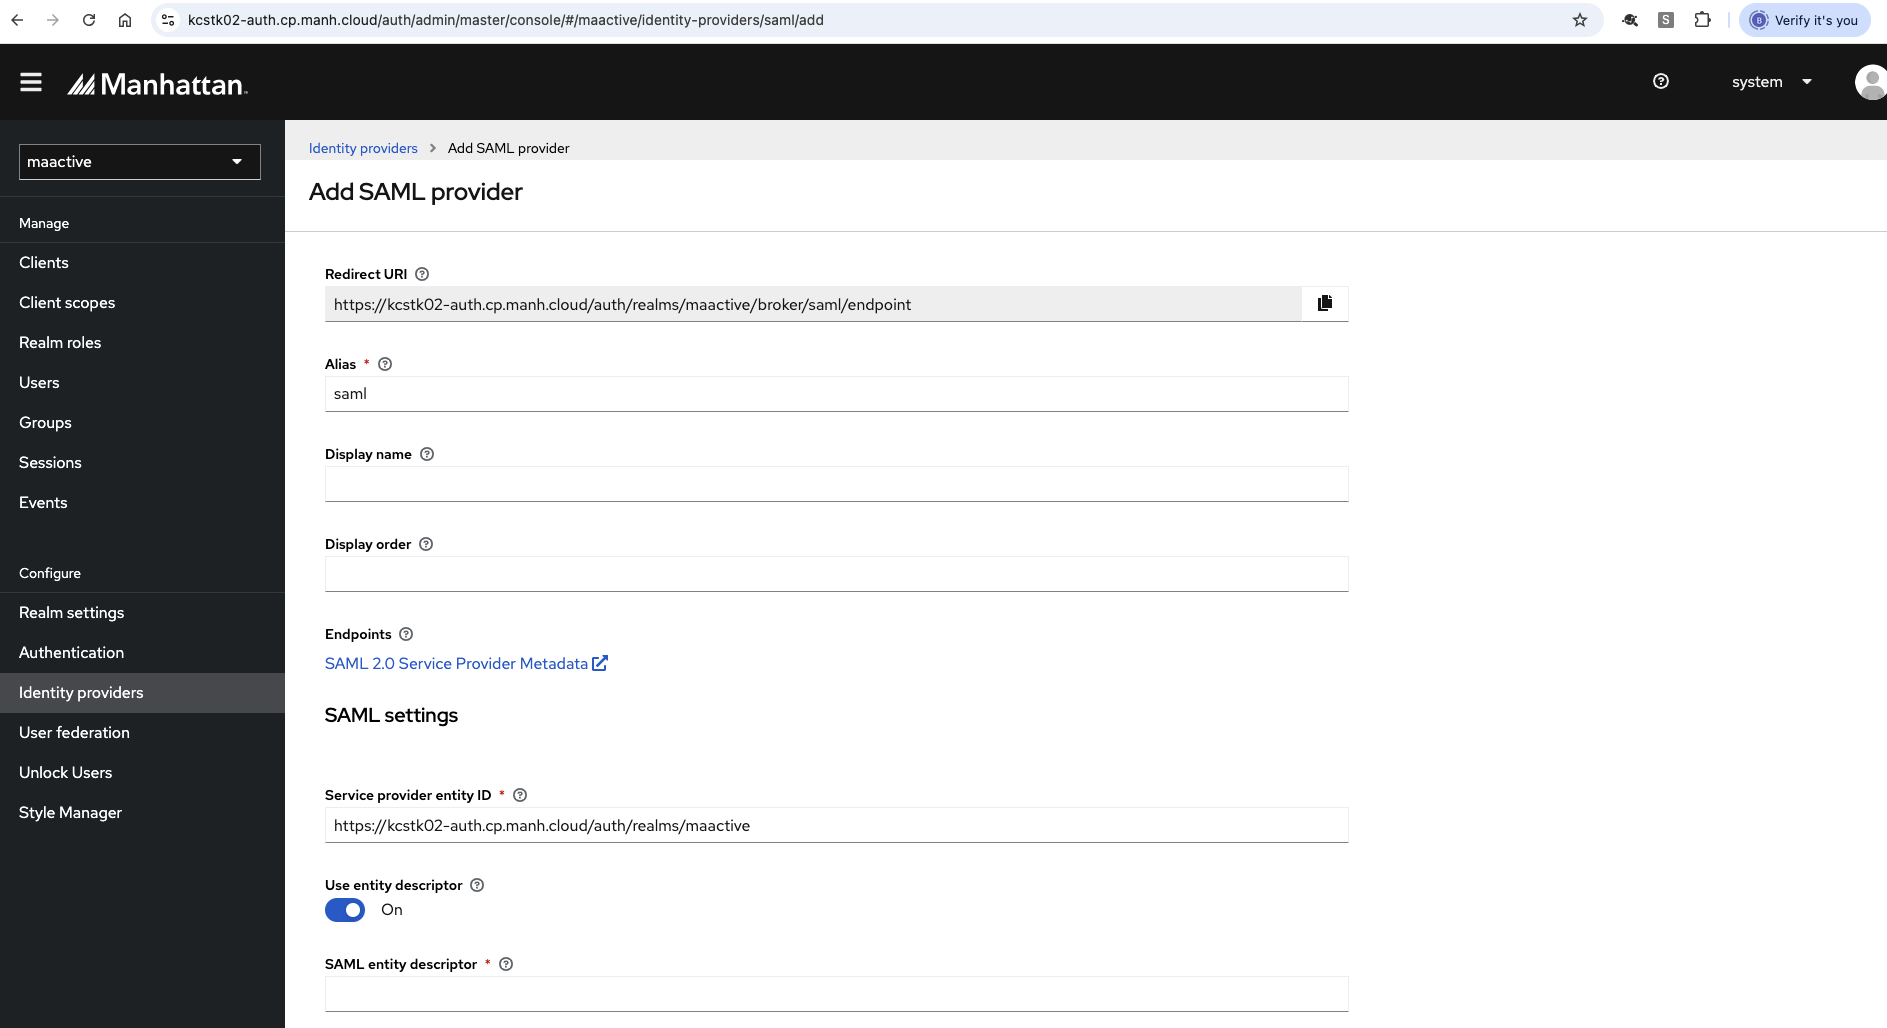
Optionally, enter Display Name. This is the name that will be displayed in case you need it to be different from the alias.
Take note of the Service provider entity ID value from the same page.
In the Service entity descriptor field, paste the URL you copied from step 2.9. If the URL is correct, you will see a green tick on the right.
Click on Add. This will create a basic SP configuration on AM 2.0 for this Azure application.
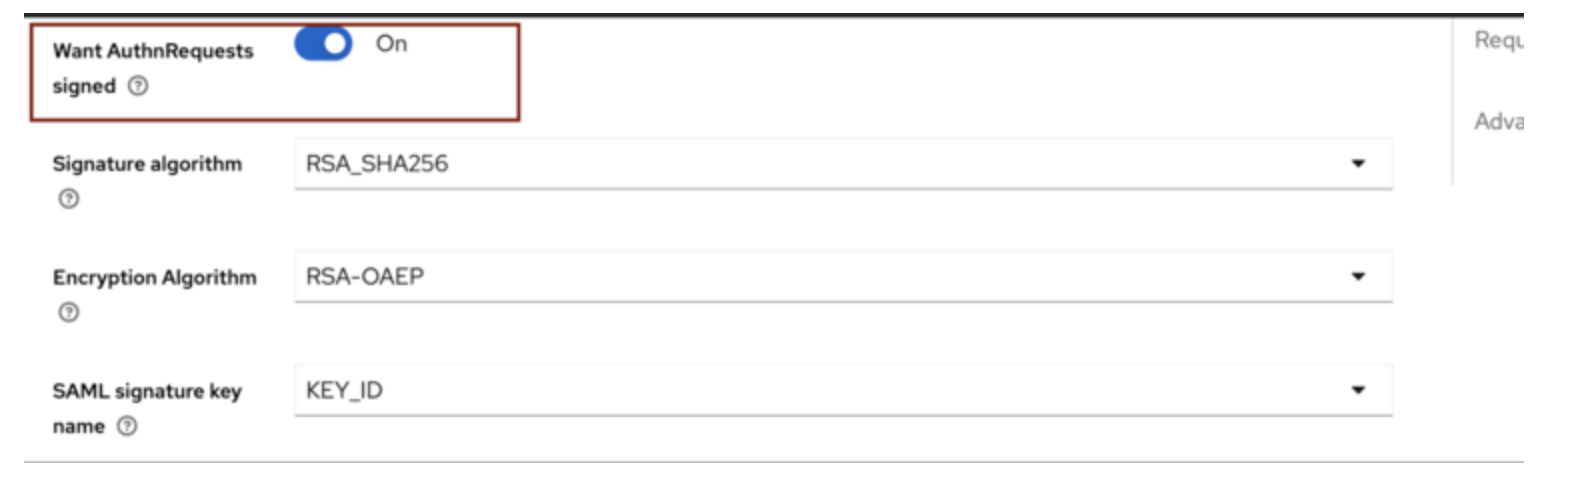
Scroll down and set the Want AuthnRequests signed option to be On.
Now scroll to the bottom of AM 2.0’s provider configuration page and select First Login Flow and Post Login Flow, if not already pre-selected.
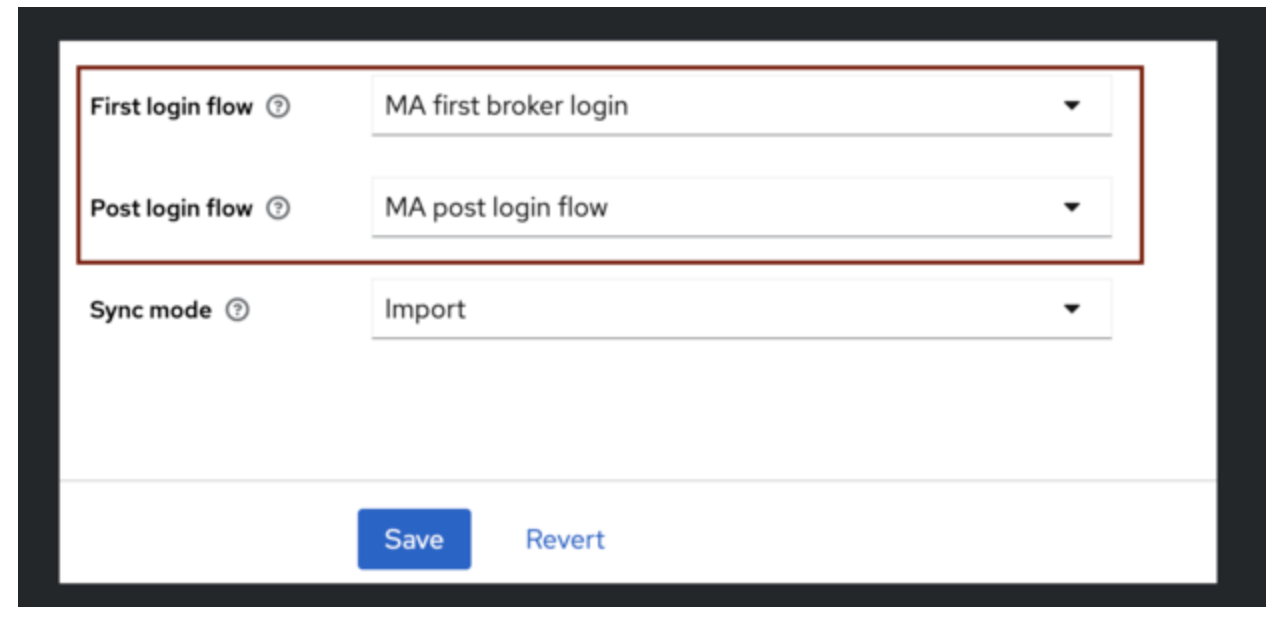
Click on Save.
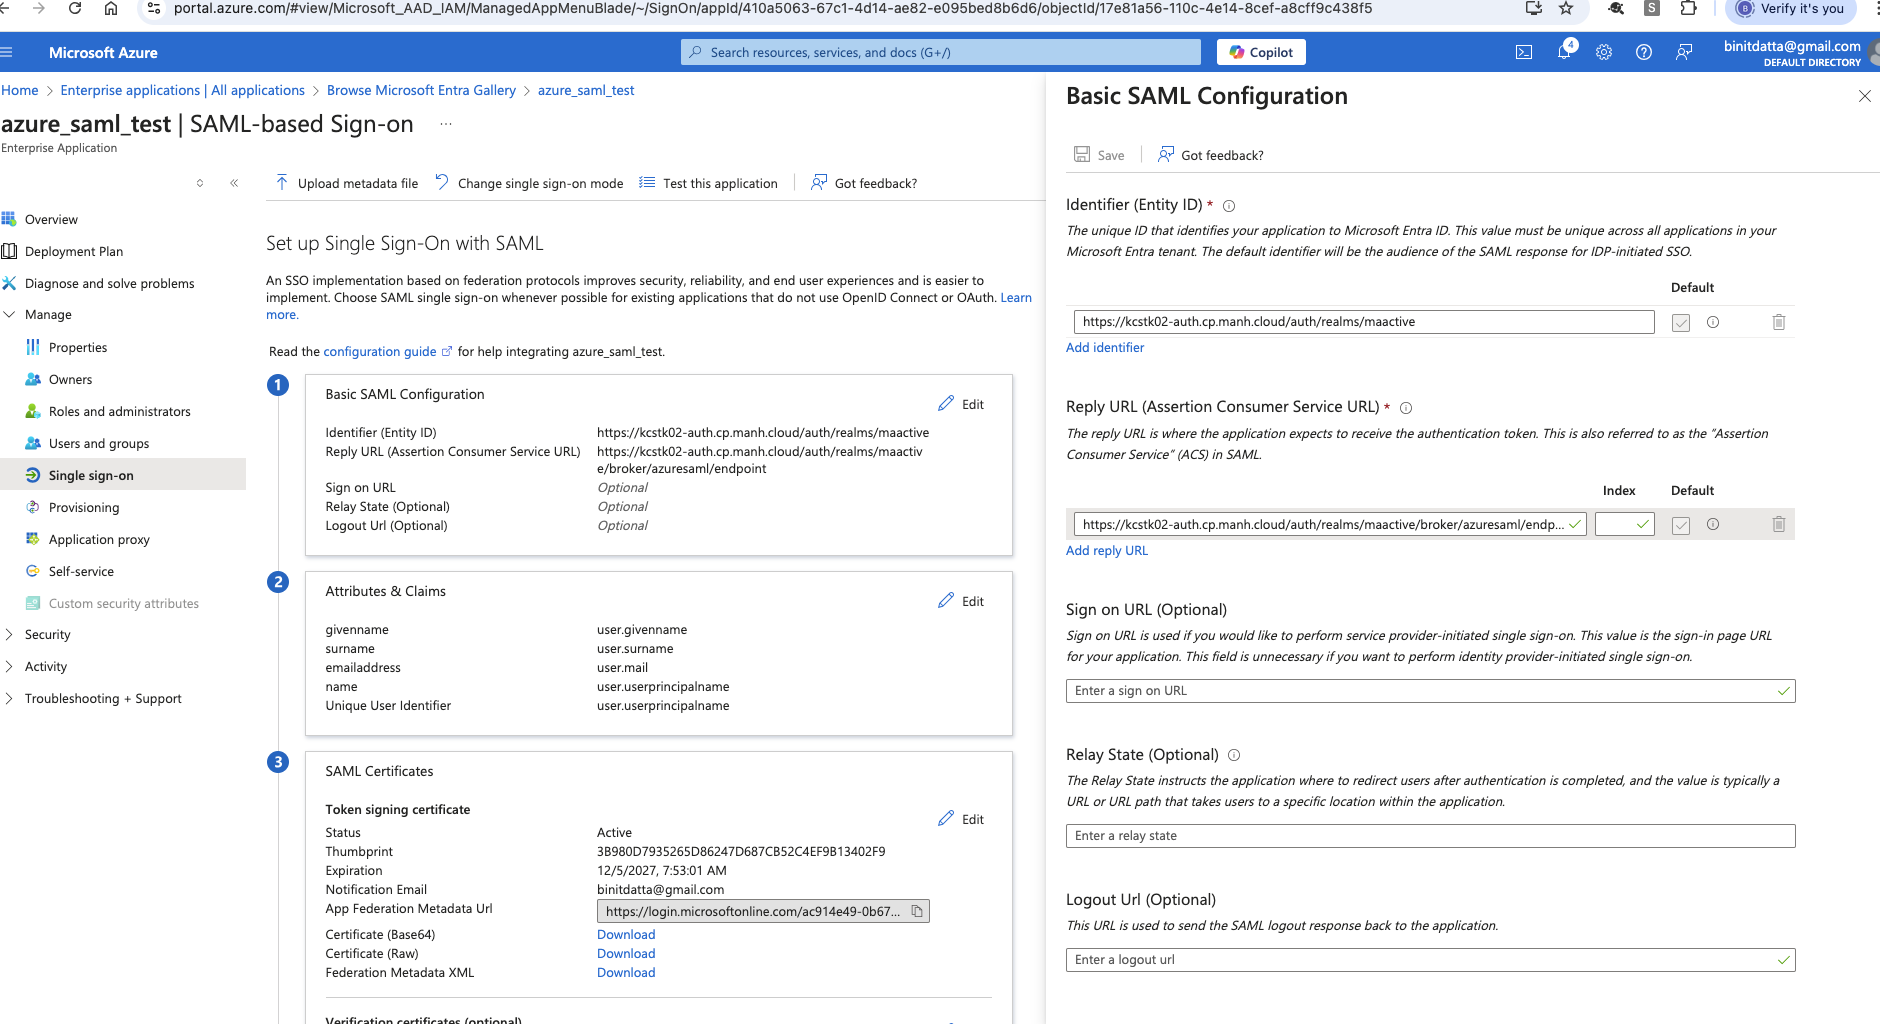
Step 3: Configure AM 2.0 details in Azure IDP
In the Single sign-on tab, edit the Basic SAML Configuration and fill in the Entity ID from step 2.5 in case you have created the config manually on AM 2.0. And in case you have created it using REST API, then you can simply open the configuration in console and fetch the values.
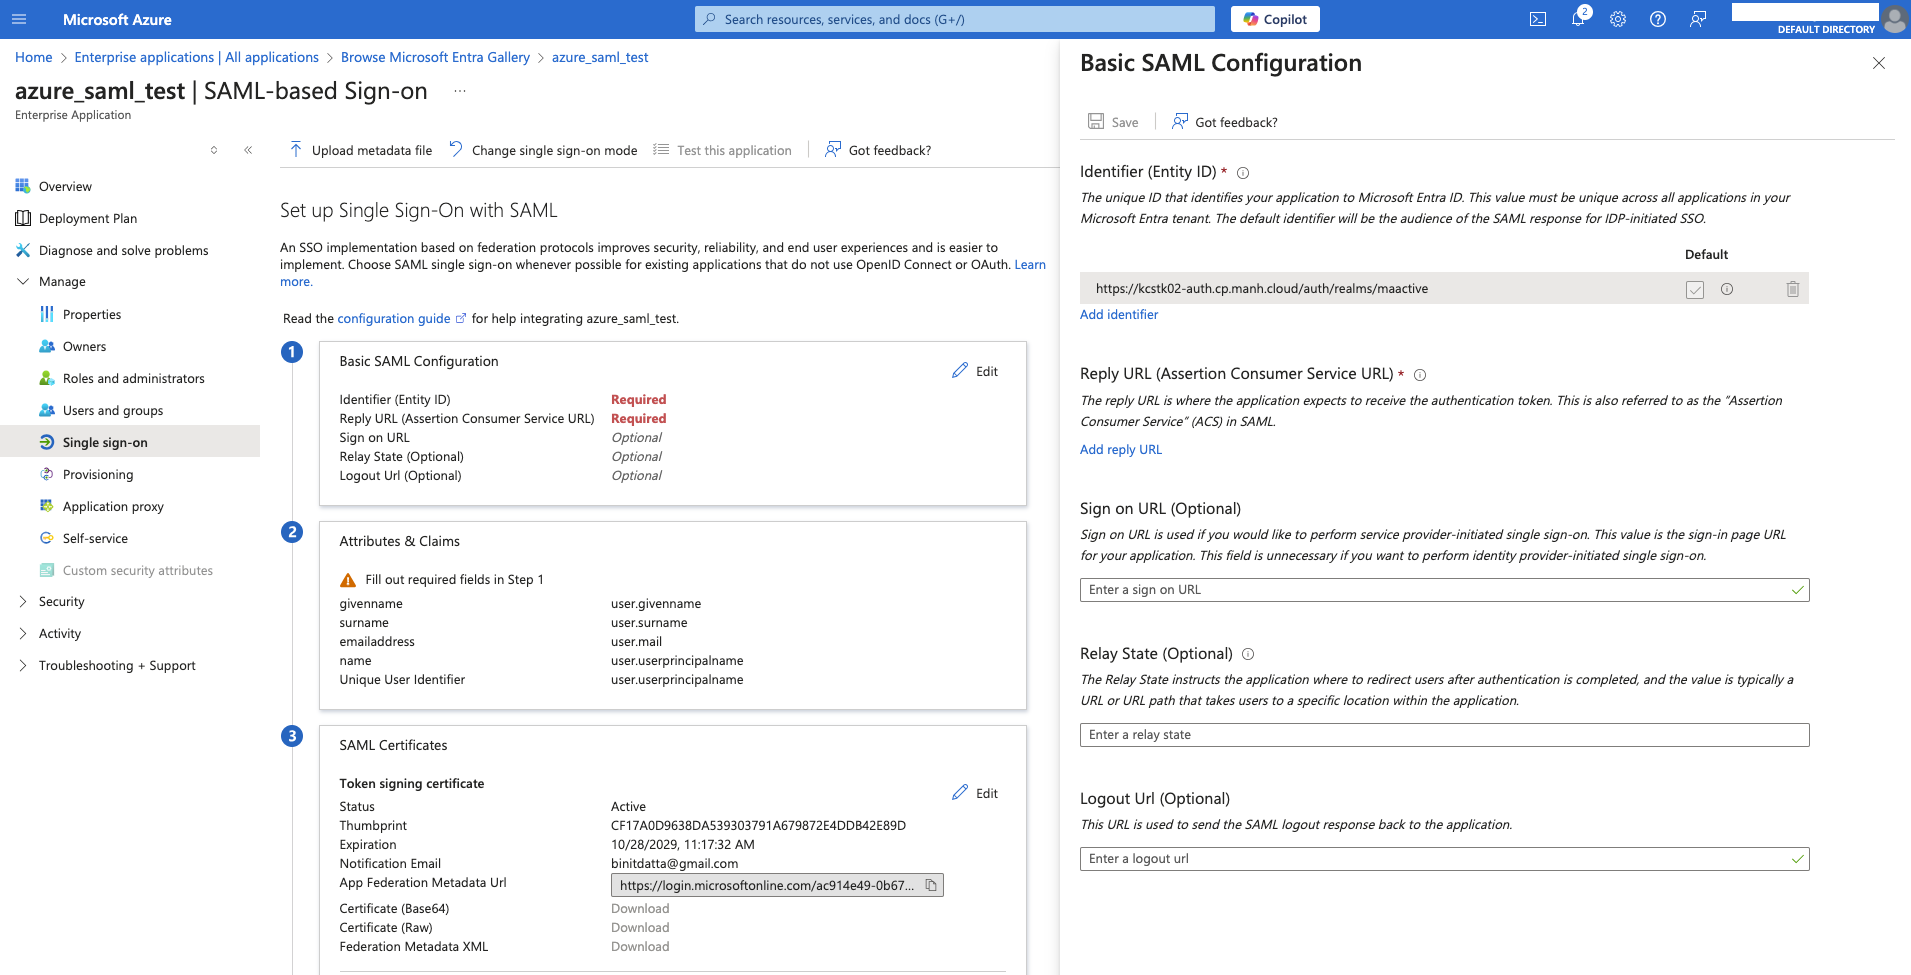
Copy the redirect URI from step 2.3 and paste it into the Add reply URL.
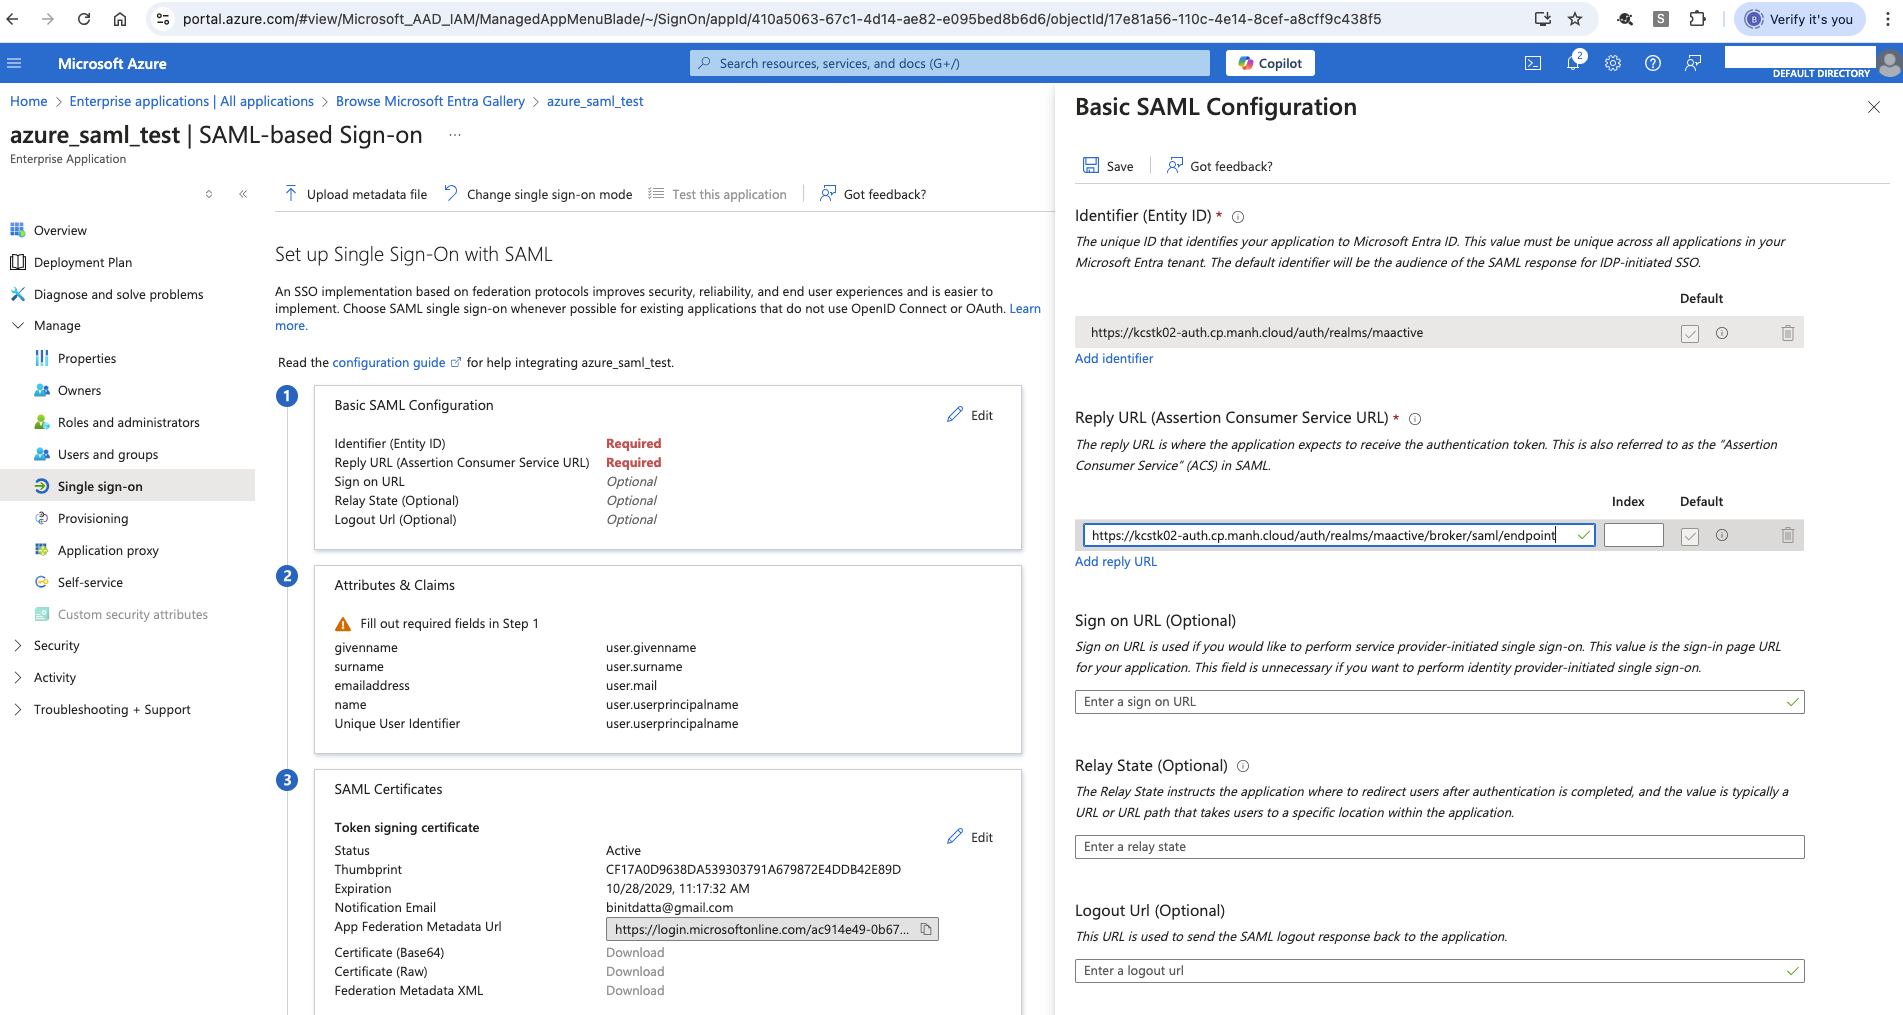
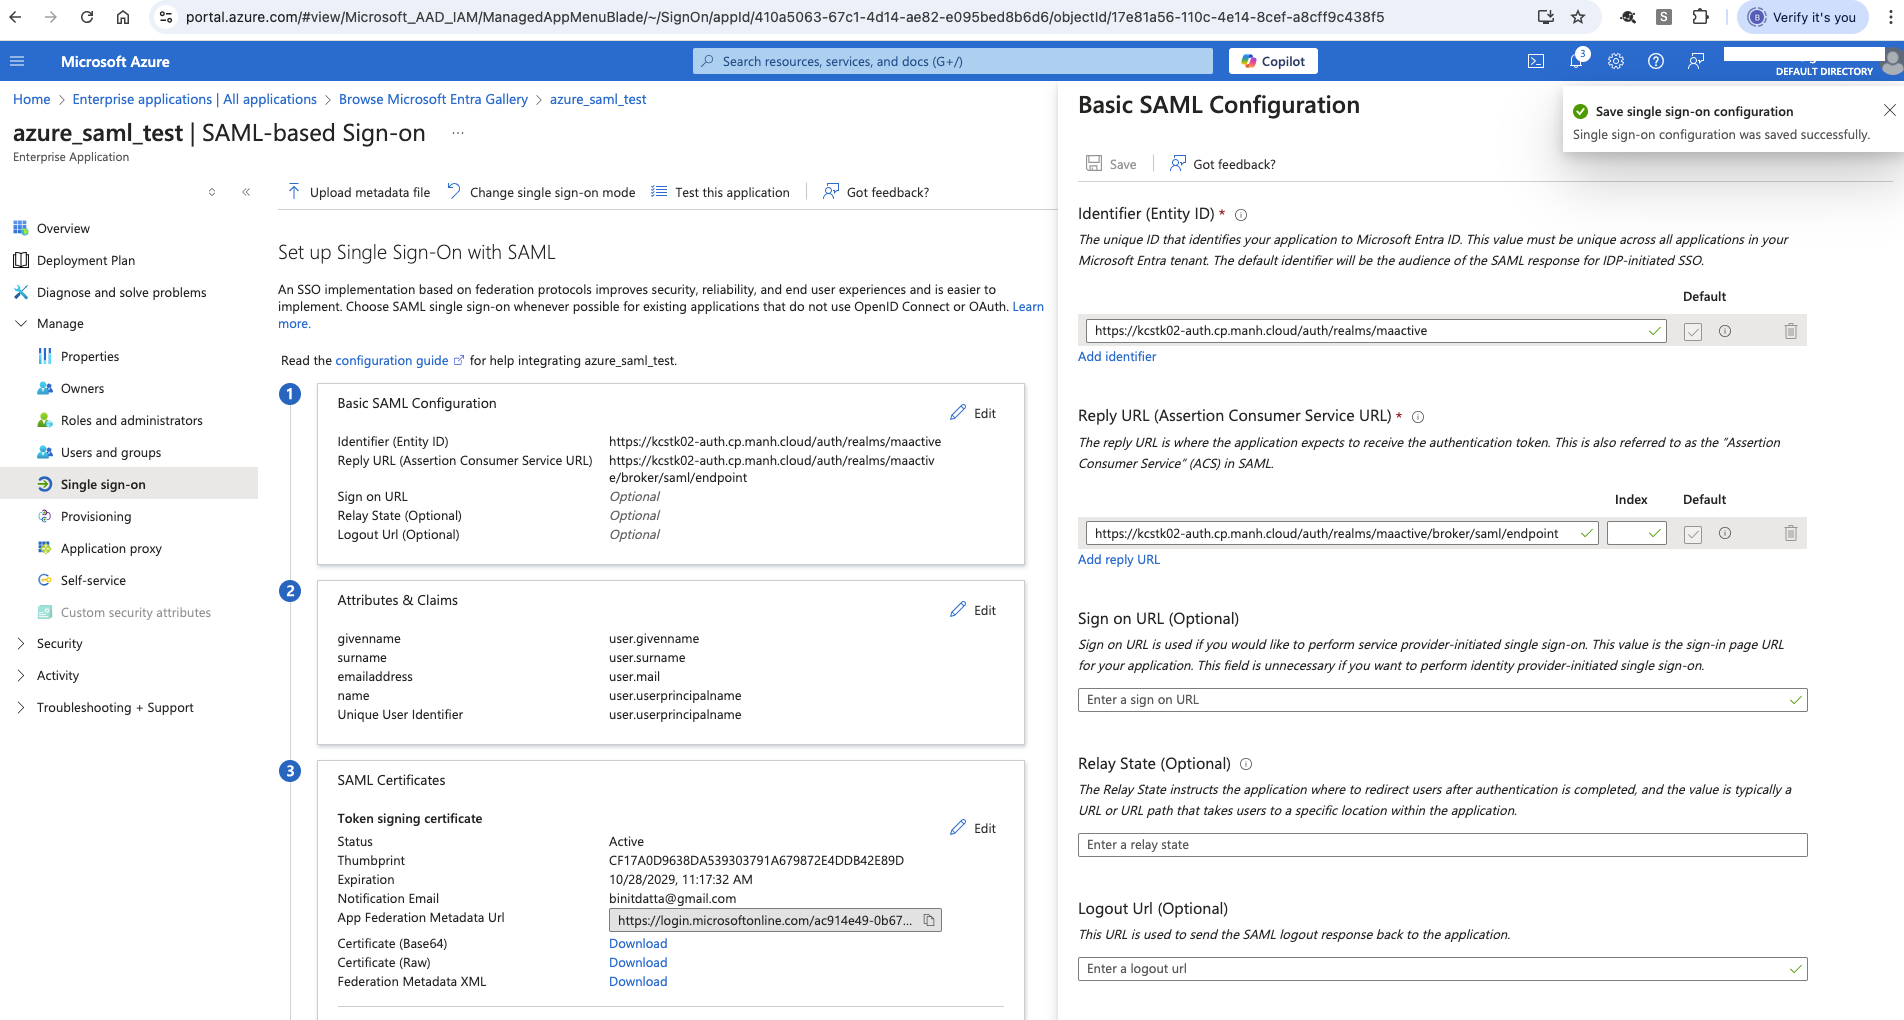
Hit the Save button on the top. You will see a confirmation message after doing so.
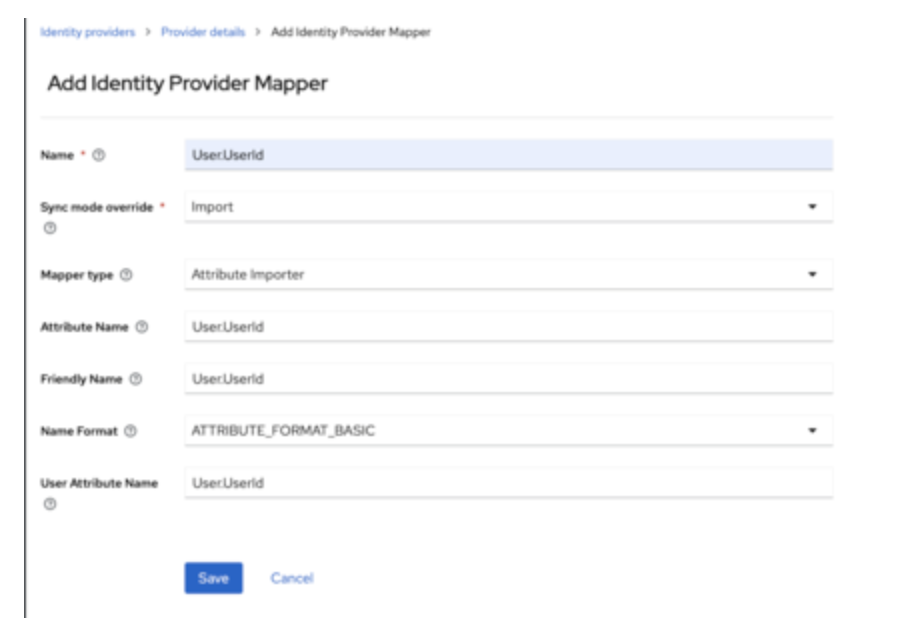
Step 4: Configure User.UserId Mapper on AM 2.0
Perform this step only if you have created IDP config on AM 2.0 manually. You can skip this step if you have created using REST API, as it already takes care of this config.
To add mappers in AM 2.0, click the Mappers tab on the same SP configuration page. Click on the Add mapper button.
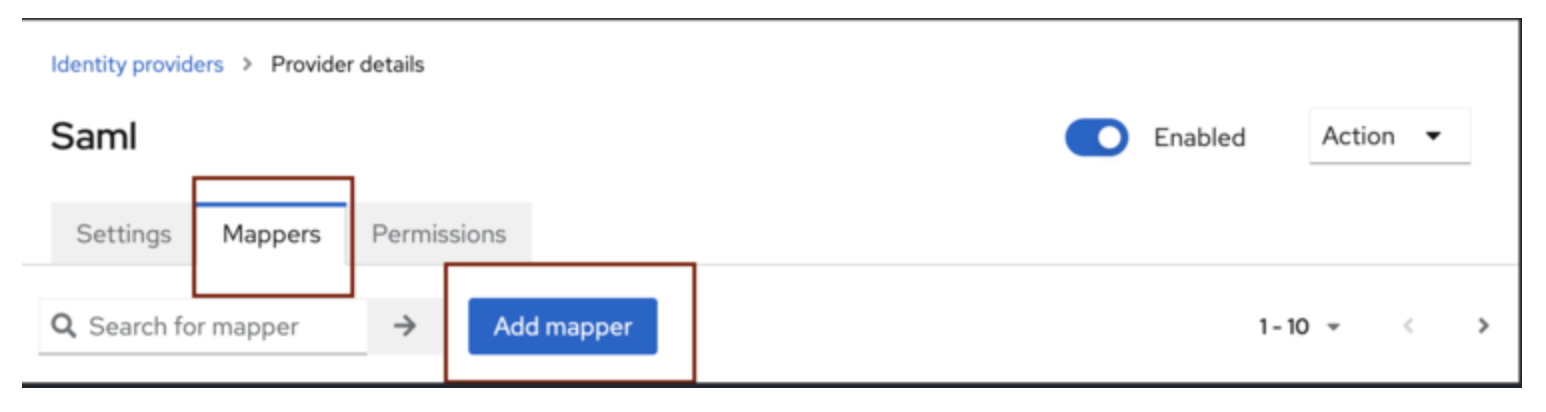
Configure User.UserId mapper by filling in the fields as shown in the image below.
Click on Save.
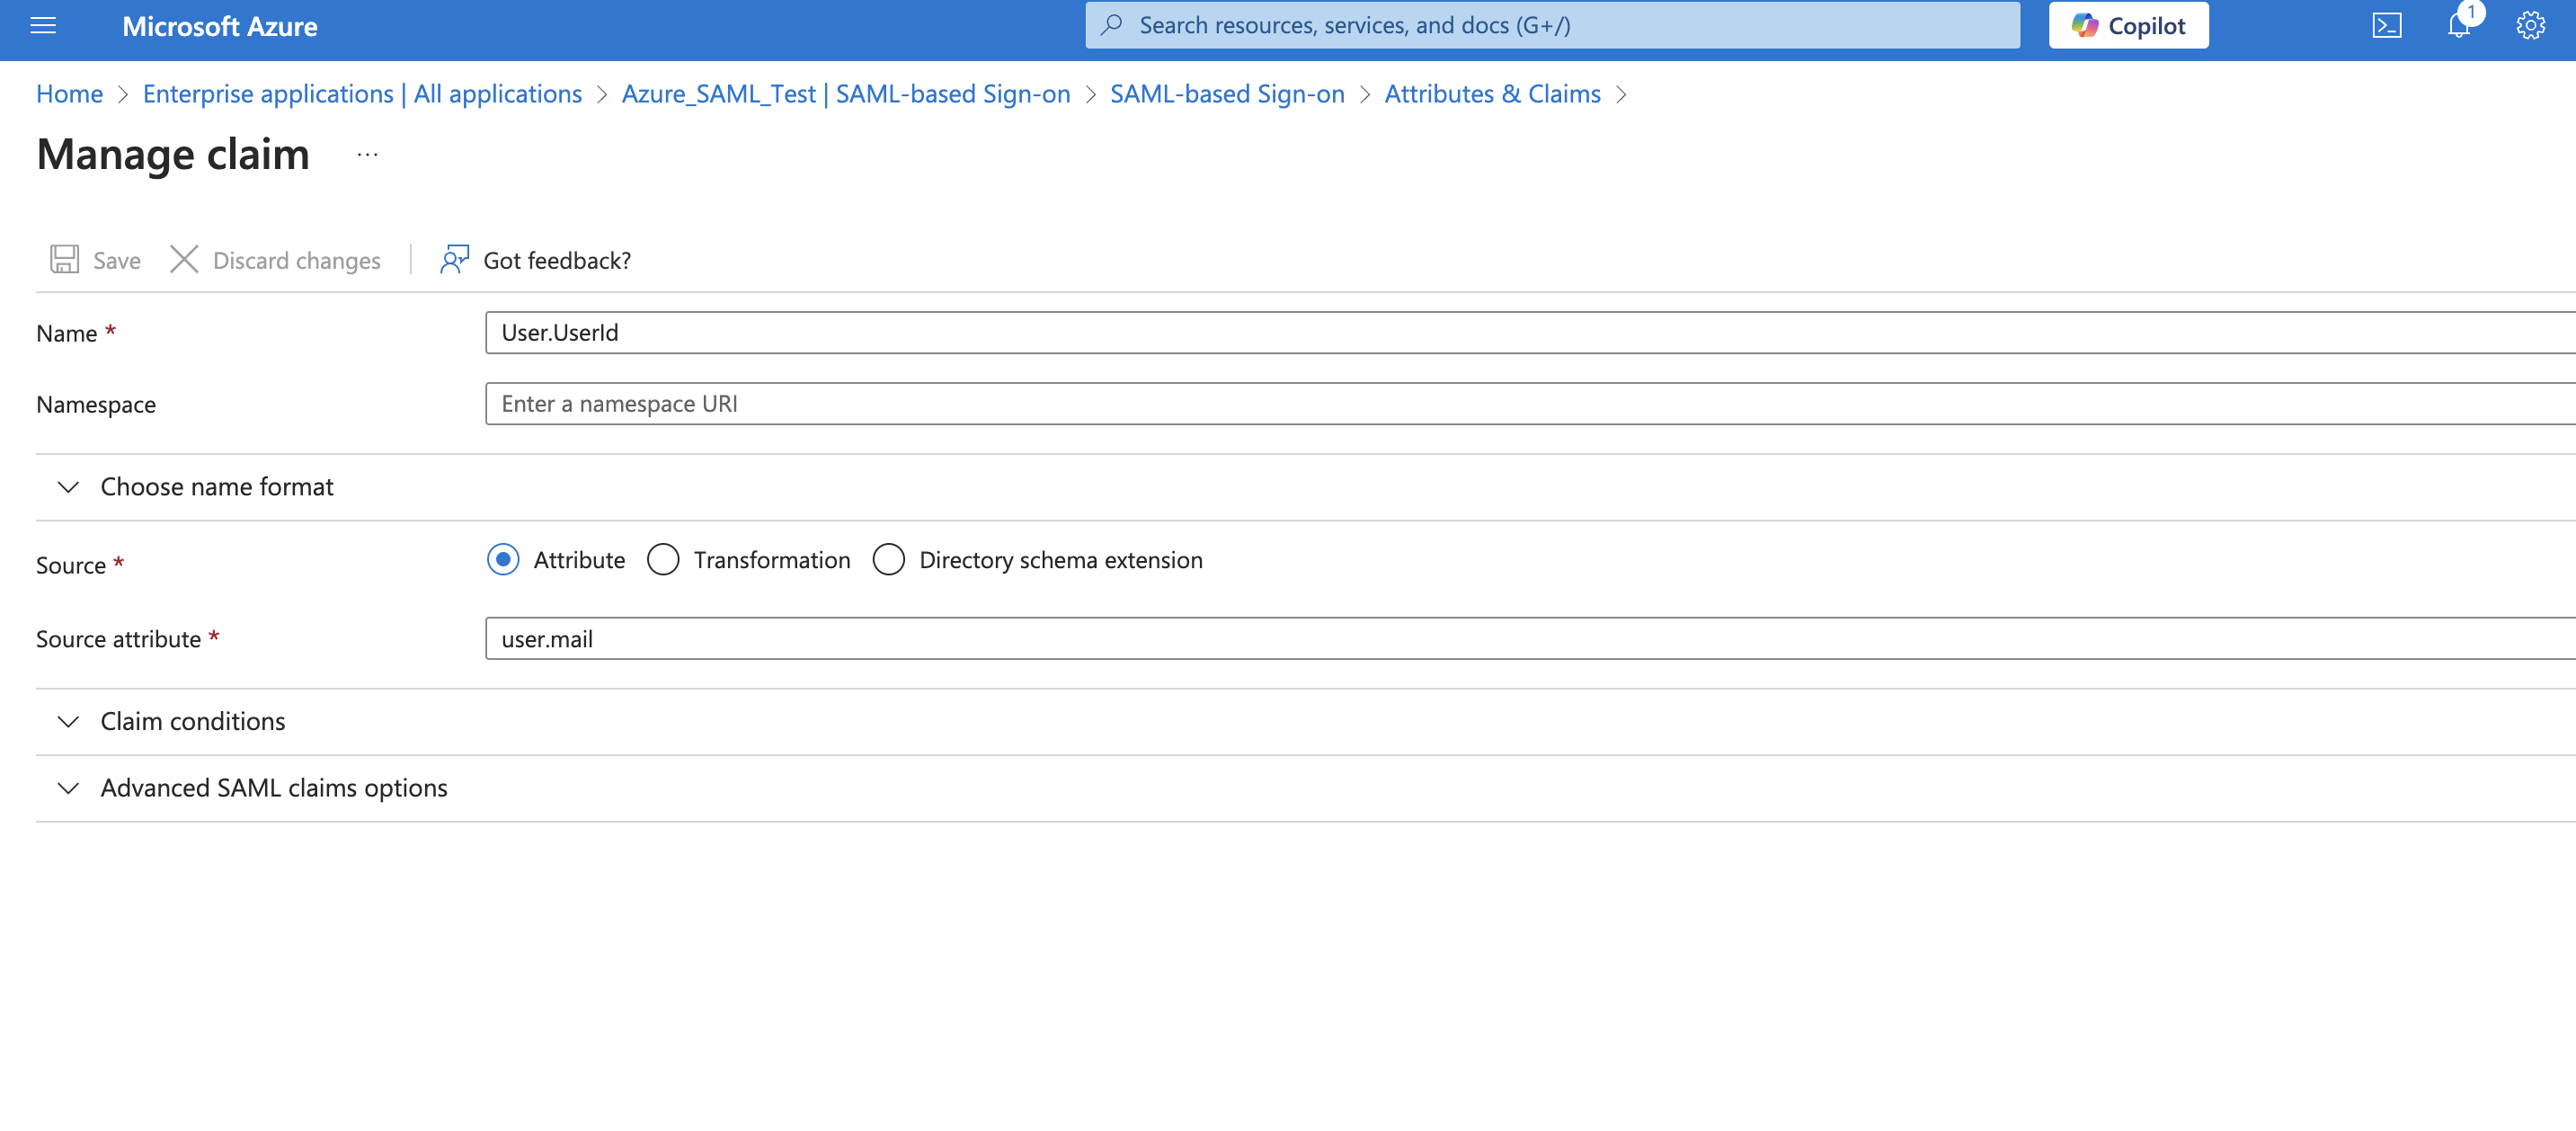
Step 5: Configure User.UserId Mapper on Azure
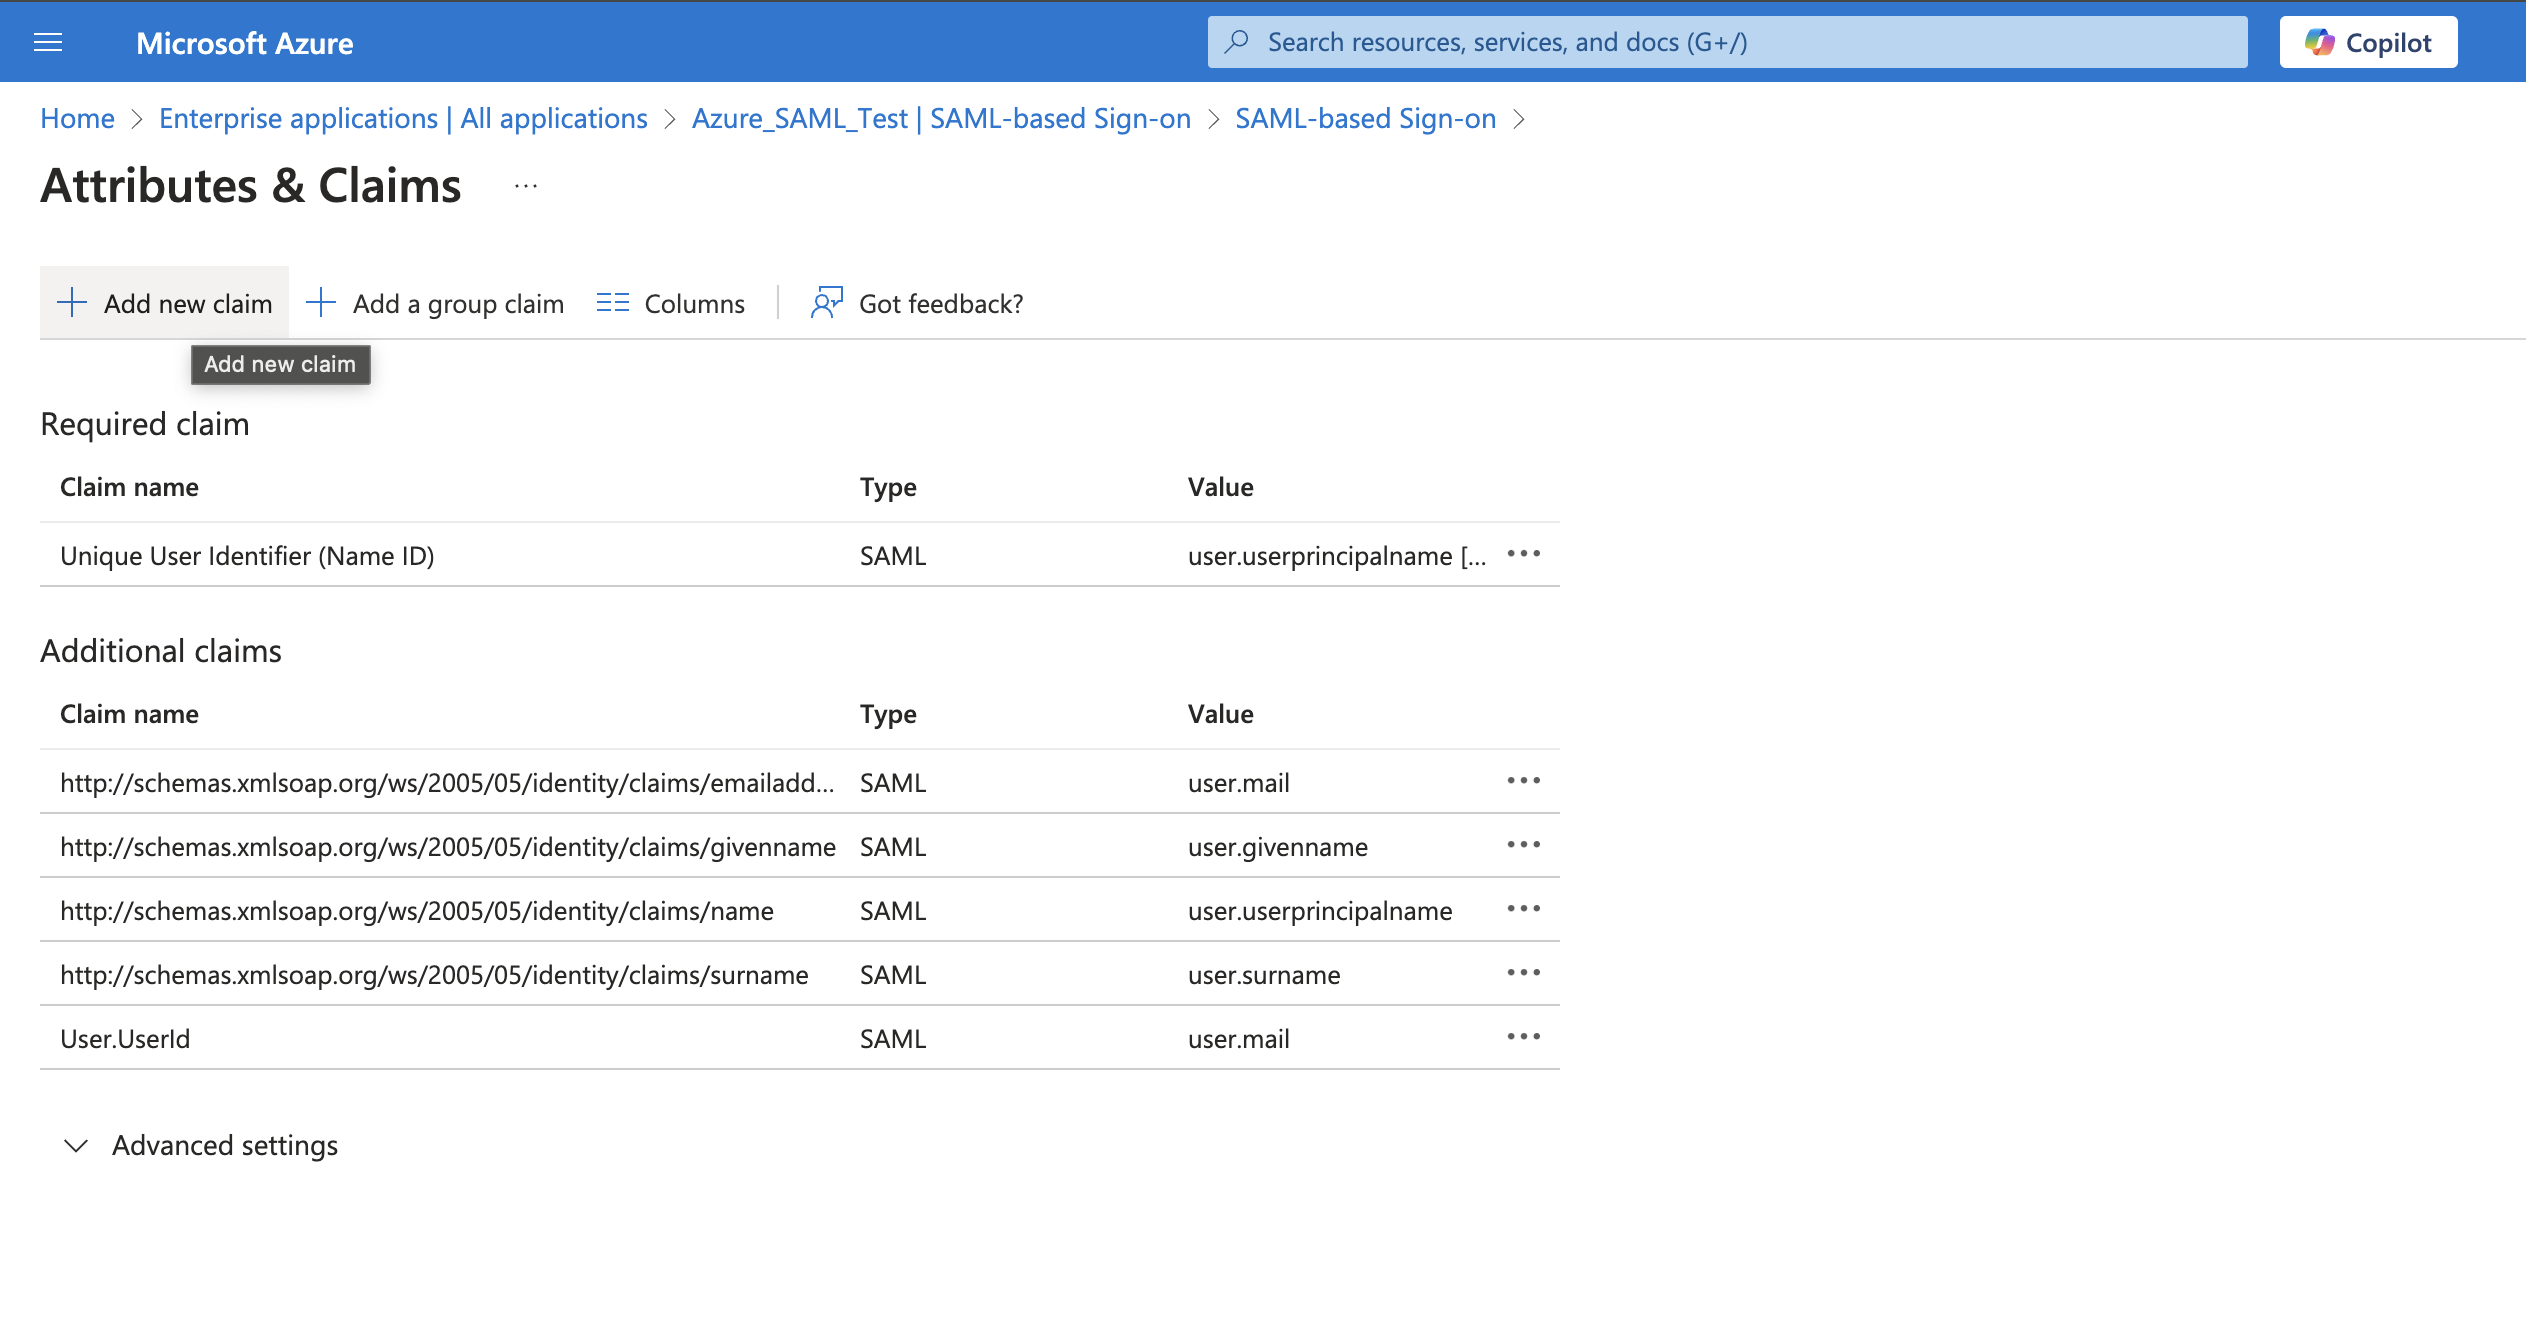
Now to add this attribute on the Azure IDP side, go to the Single sign-on tab and edit the Attributes & Claims tile.
Click on Add new claim and then add User.UserId as an attribute as shown below.
Step 6: Configure Mapping for JIT on AM 2.0 (this step is mandatory only if you would like to enable SAML JIT)
Perform this step only if you have created IDP config on AM 2.0 manually. You can skip this step if you have created using REST API, as it already takes care of this config.
To add mappers in AM 2.0, click the Mappers tab on the same SP configuration page. Click on the Add mapper button.
Similarly, configure the User.LocaleId mapper by filling in the fields as shown in the image below.
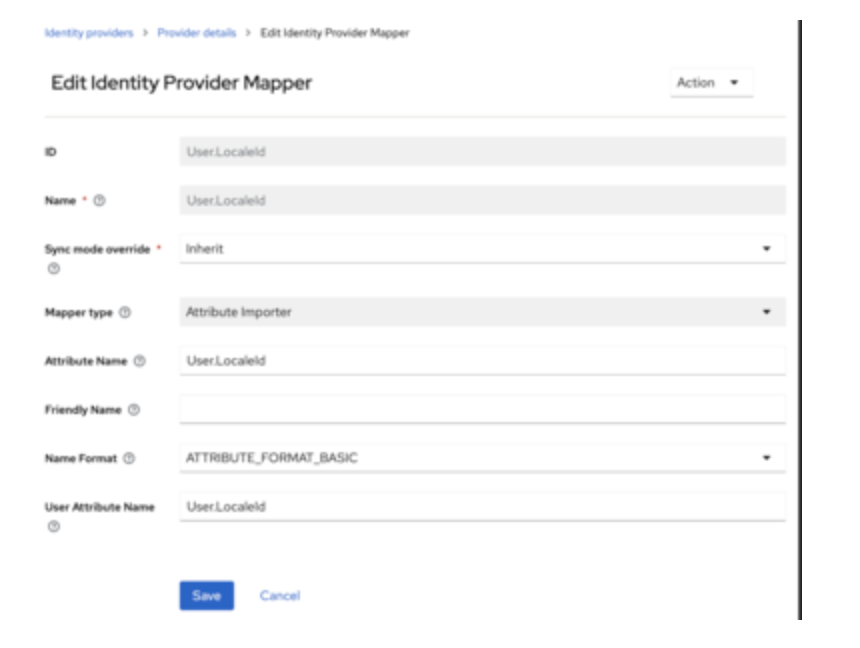
Click on Save.
Similarly, configure User.PrimaryOrgId mapper by filling in the fields as shown in the image below.
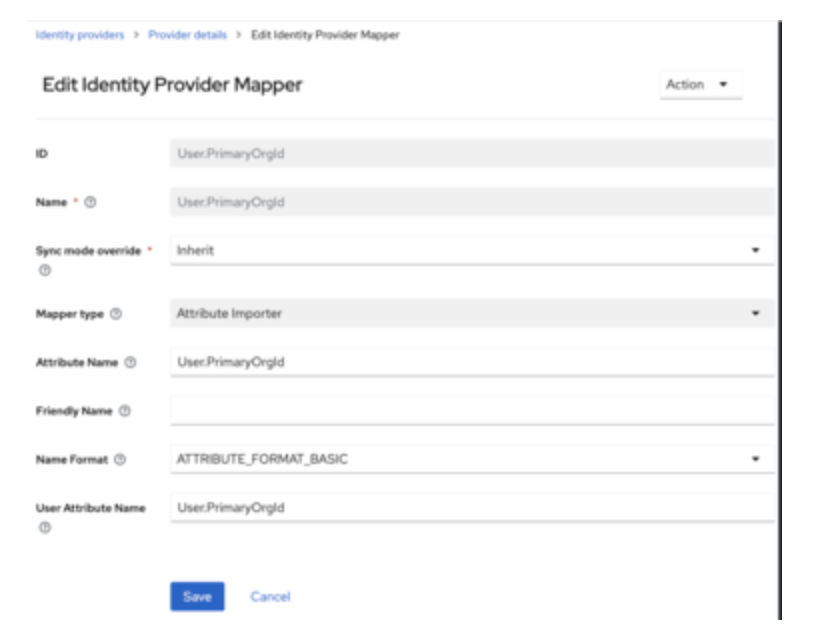
Click on Save.
Similarly, configure User.Roles mapper by filling in the fields as shown in the image below.
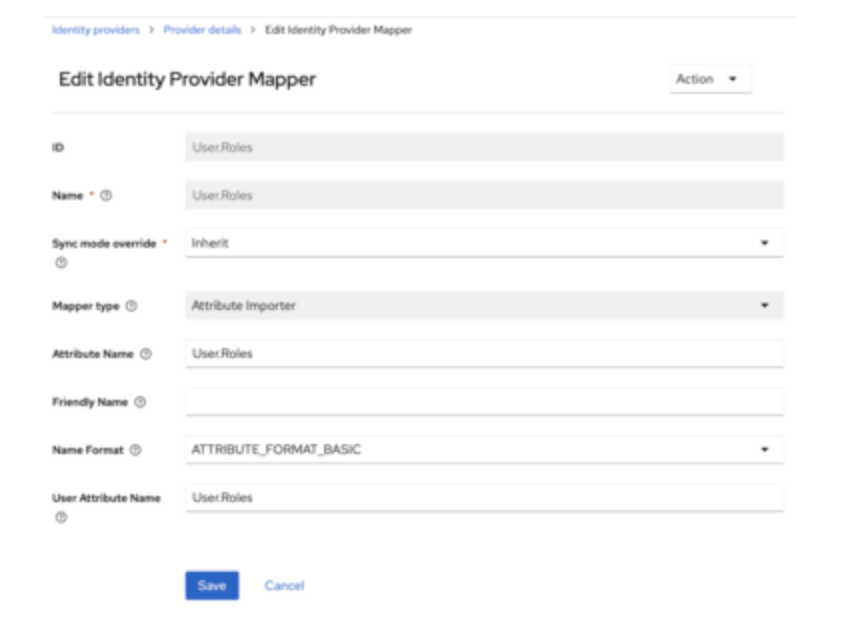
Click on Save.
Step 7: Configure Mapping for JIT on Azure (this step is mandatory only if you would like to enable SAML JIT)
To add attributes on the Azure IDP side, go to the Single sign-on tab and edit the Attributes & Claims tile.
Click on Add new claim, then add the User.LocaleId, User.PrimaryOrgId, and User.Roles attributes individually.
Step 8: Additional attributes configuration
Perform this step only if you have created IDP config on AM 2.0 manually. You can skip this step if you have created using REST API, as it already takes care of this config.
In case additional attributes are needed, they can be configured as well. Below is a list of attributes that can be configured.\
You will have to pass these exact attribute names from Azure to receive on AM 2.0.
Attributes shown below can be configured on IDP, as well as SP.
| Access Management 2.0 SAML Attribute Name | Multi Valued or Not |
|---|---|
| User.UserId | No |
| User.PrimaryOrgId | No |
| User.FirstName | No |
| User.LastName | No |
| User.LocaleId | No |
| User.DateOfBirth | No |
| User.UserOrgs | Yes |
| User.Locations | Yes |
| User.Gender | No |
| User.Address1 | No |
| User.Address2 | No |
| User.City | No |
| User.State | No |
| User.PostalCode | No |
| User.Country | No |
| User.Phone | No |
| User.Email2 | No |
| User.UserTimeZone | No |
| User.AvailableUserLocales | Yes |
| User.DataAccessTags | No |
| User.HasAccessToAllBUs | No |
| User.DefaultOrganization | No |
| User.DefaultLocation | No |
| User.DefaultBusinessUnit | No |
Author
Shipra Choudhary: Tech Lead, Application Security, ActivePlatform™, R&D.
Feedback
Was this page helpful?